How to Build a Full-Stack React App with Node.js Backend (Step by Step)
Learn how to build a complete full-stack task manager from scratch using React, Node.js, Express, and MongoDB. Includes JWT auth and deployment.
Technically reviewed by:
Steven W.|Andre F.|Hryhorii O.
Table of contents
Key Takeaways
- A full-stack app has three layers: the frontend (React) handles the UI, the backend (Node.js + Express) handles logic and API requests, and the database (MongoDB) stores your data.
- Vite is the recommended build tool for React in 2026, and its built-in proxy makes connecting to your backend during development simple.
- Mongoose makes working with MongoDB easier. It gives you schemas, validation, and a clean query API on top of the raw database driver.
- JWT authentication is the standard for stateless API auth. Always hash passwords with bcrypt and never store secrets in your source code.
- Deploying a full-stack app means hosting three things separately: the frontend (Vercel), the backend (Railway), and the database (MongoDB Atlas).
- Most full-stack bugs come from a small set of issues: CORS errors, database connection problems, token storage mistakes, and unhandled async errors. Knowing these in advance saves hours of debugging.
If you can build a React app but get stuck every time you need a database or user login, this guide is for you. We're going to build a full-stack task manager from scratch: React on the front end, Node.js on the back end, and MongoDB for the database. By the end, you'll have something you can actually deploy.
Both React and Node.js run on JavaScript, so you're writing one language across the whole app. That alone saves a ton of headaches. And it's not just us saying that; the Stack Overflow Developer Survey also shows Node.js is still used by over 40% of professional developers.
We've built this exact setup for multiple client projects at Softaims, and we keep coming back to it because that's all you need, all the time. If you need a React refresher first, read this: The Complete Guide to React for Absolute Beginners 2026.
Let's get into it.
Why Use React and Node.js Together?
Before we write any code, let's talk about why React and Node.js work so well together.
One Language, Everywhere
The biggest win is that you're writing JavaScript on both sides. Your frontend developer can jump into the backend without learning a new language. You can share validation logic, utility functions, and data types between the client and server. No duplication, fewer bugs.
React Handles the UI; Node.js Handles the Load
React breaks your interface into reusable components, making it much easier to build and maintain complex UIs. On the backend, Node.js uses a non-blocking I/O model that's great at handling many requests simultaneously without slowing down.
Tons of Packages for Almost Everything
npm has over 1.8 million packages. Need auth? There's a package. File uploads? There's a package. Real-time chat? You get the idea. React has its own mature ecosystem too, with state management, routing, and testing libraries that companies like Netflix and Airbnb use in production.
Where It Fits (and Where It Doesn't)
This tech stack is great for web apps, SaaS tools, dashboards, and anything API-driven. It's not ideal for heavy computation; think video processing or ML model inference. Node.js is single-threaded, so CPU-heavy work can crush it. For those cases, you'd offload to worker threads or a service written in something like Go.
If you're putting together a team for this kind of project, browsing developers with React and Node.js experience can save you a lot of time.
How a Full-Stack App Actually Works
Think of it as three layers that talk to each other.
The frontend is everything the user sees. React runs in the browser, renders the interface, and sends requests to the server when the user does something.
The backend is where the logic lives. It processes those requests, performs the necessary actions (such as creating a task, verifying a password, or fetching data), and sends a response back to the user. We're using Node.js with Express for the backend.
The database is where data lives permanently. MongoDB stores it in a flexible JSON-like format, so you don't need to set up rigid table structures before you start building.
Here's how the three layers connect:
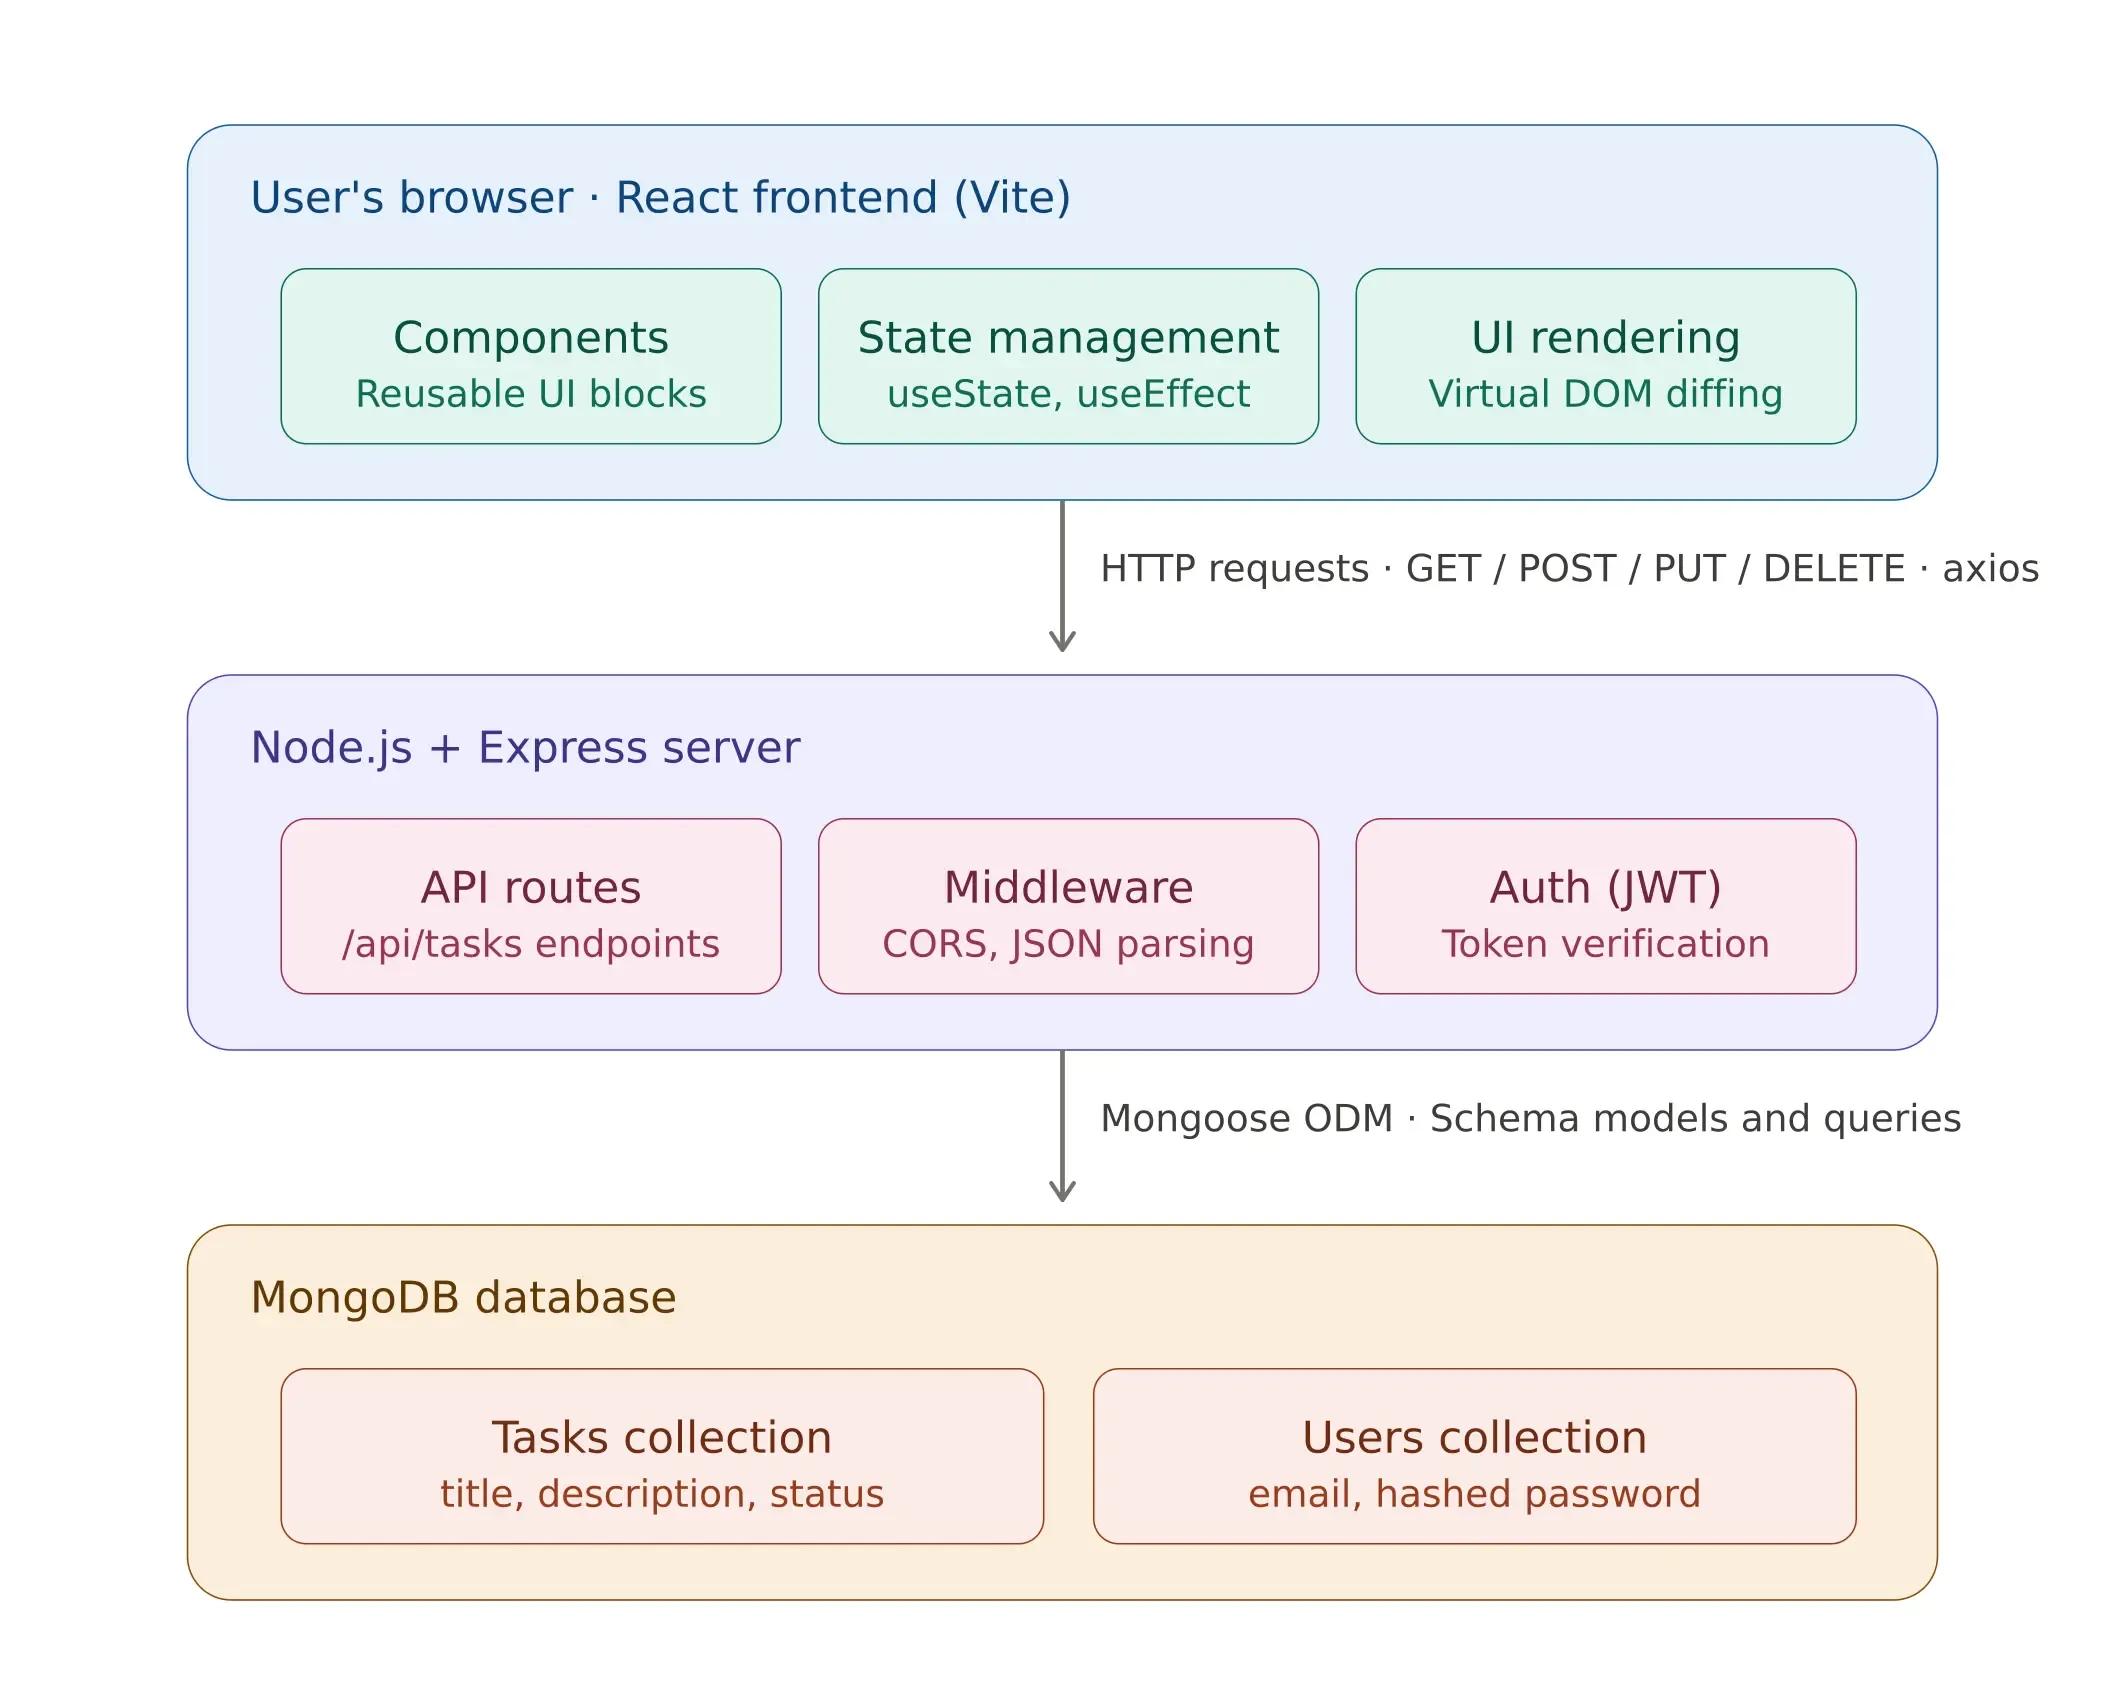
Each layer does its own job and doesn't care how the other layers work internally. That's what makes it possible to swap out parts later (say, replacing MongoDB with PostgreSQL) without rewriting the whole app. This is also the first thing experienced engineers look at when they review a full-stack codebase.
Project Overview: What We Are Building
Our task manager will have these features:
- Full CRUD operations to create, read, update, and delete tasks
- Structured data model where each task has a title, description, and status (todo, in progress, done)
- REST API backend with Express endpoints following standard HTTP conventions
- MongoDB persistence using document-based storage with Mongoose as the ODM
- React frontend with a clean, component-based interface consuming the API
We will keep the frontend and backend in the same repository, but in separate folders. This monorepo structure keeps development simple while maintaining clear boundaries between the two layers.
task-manager/
  client/     (React frontend)
  server/     (Node.js backend)
  package.json
Before we start coding, it is worth understanding the full lifecycle of a single user action. When someone clicks "Add Task" in the UI, here is everything that happens under the hood:
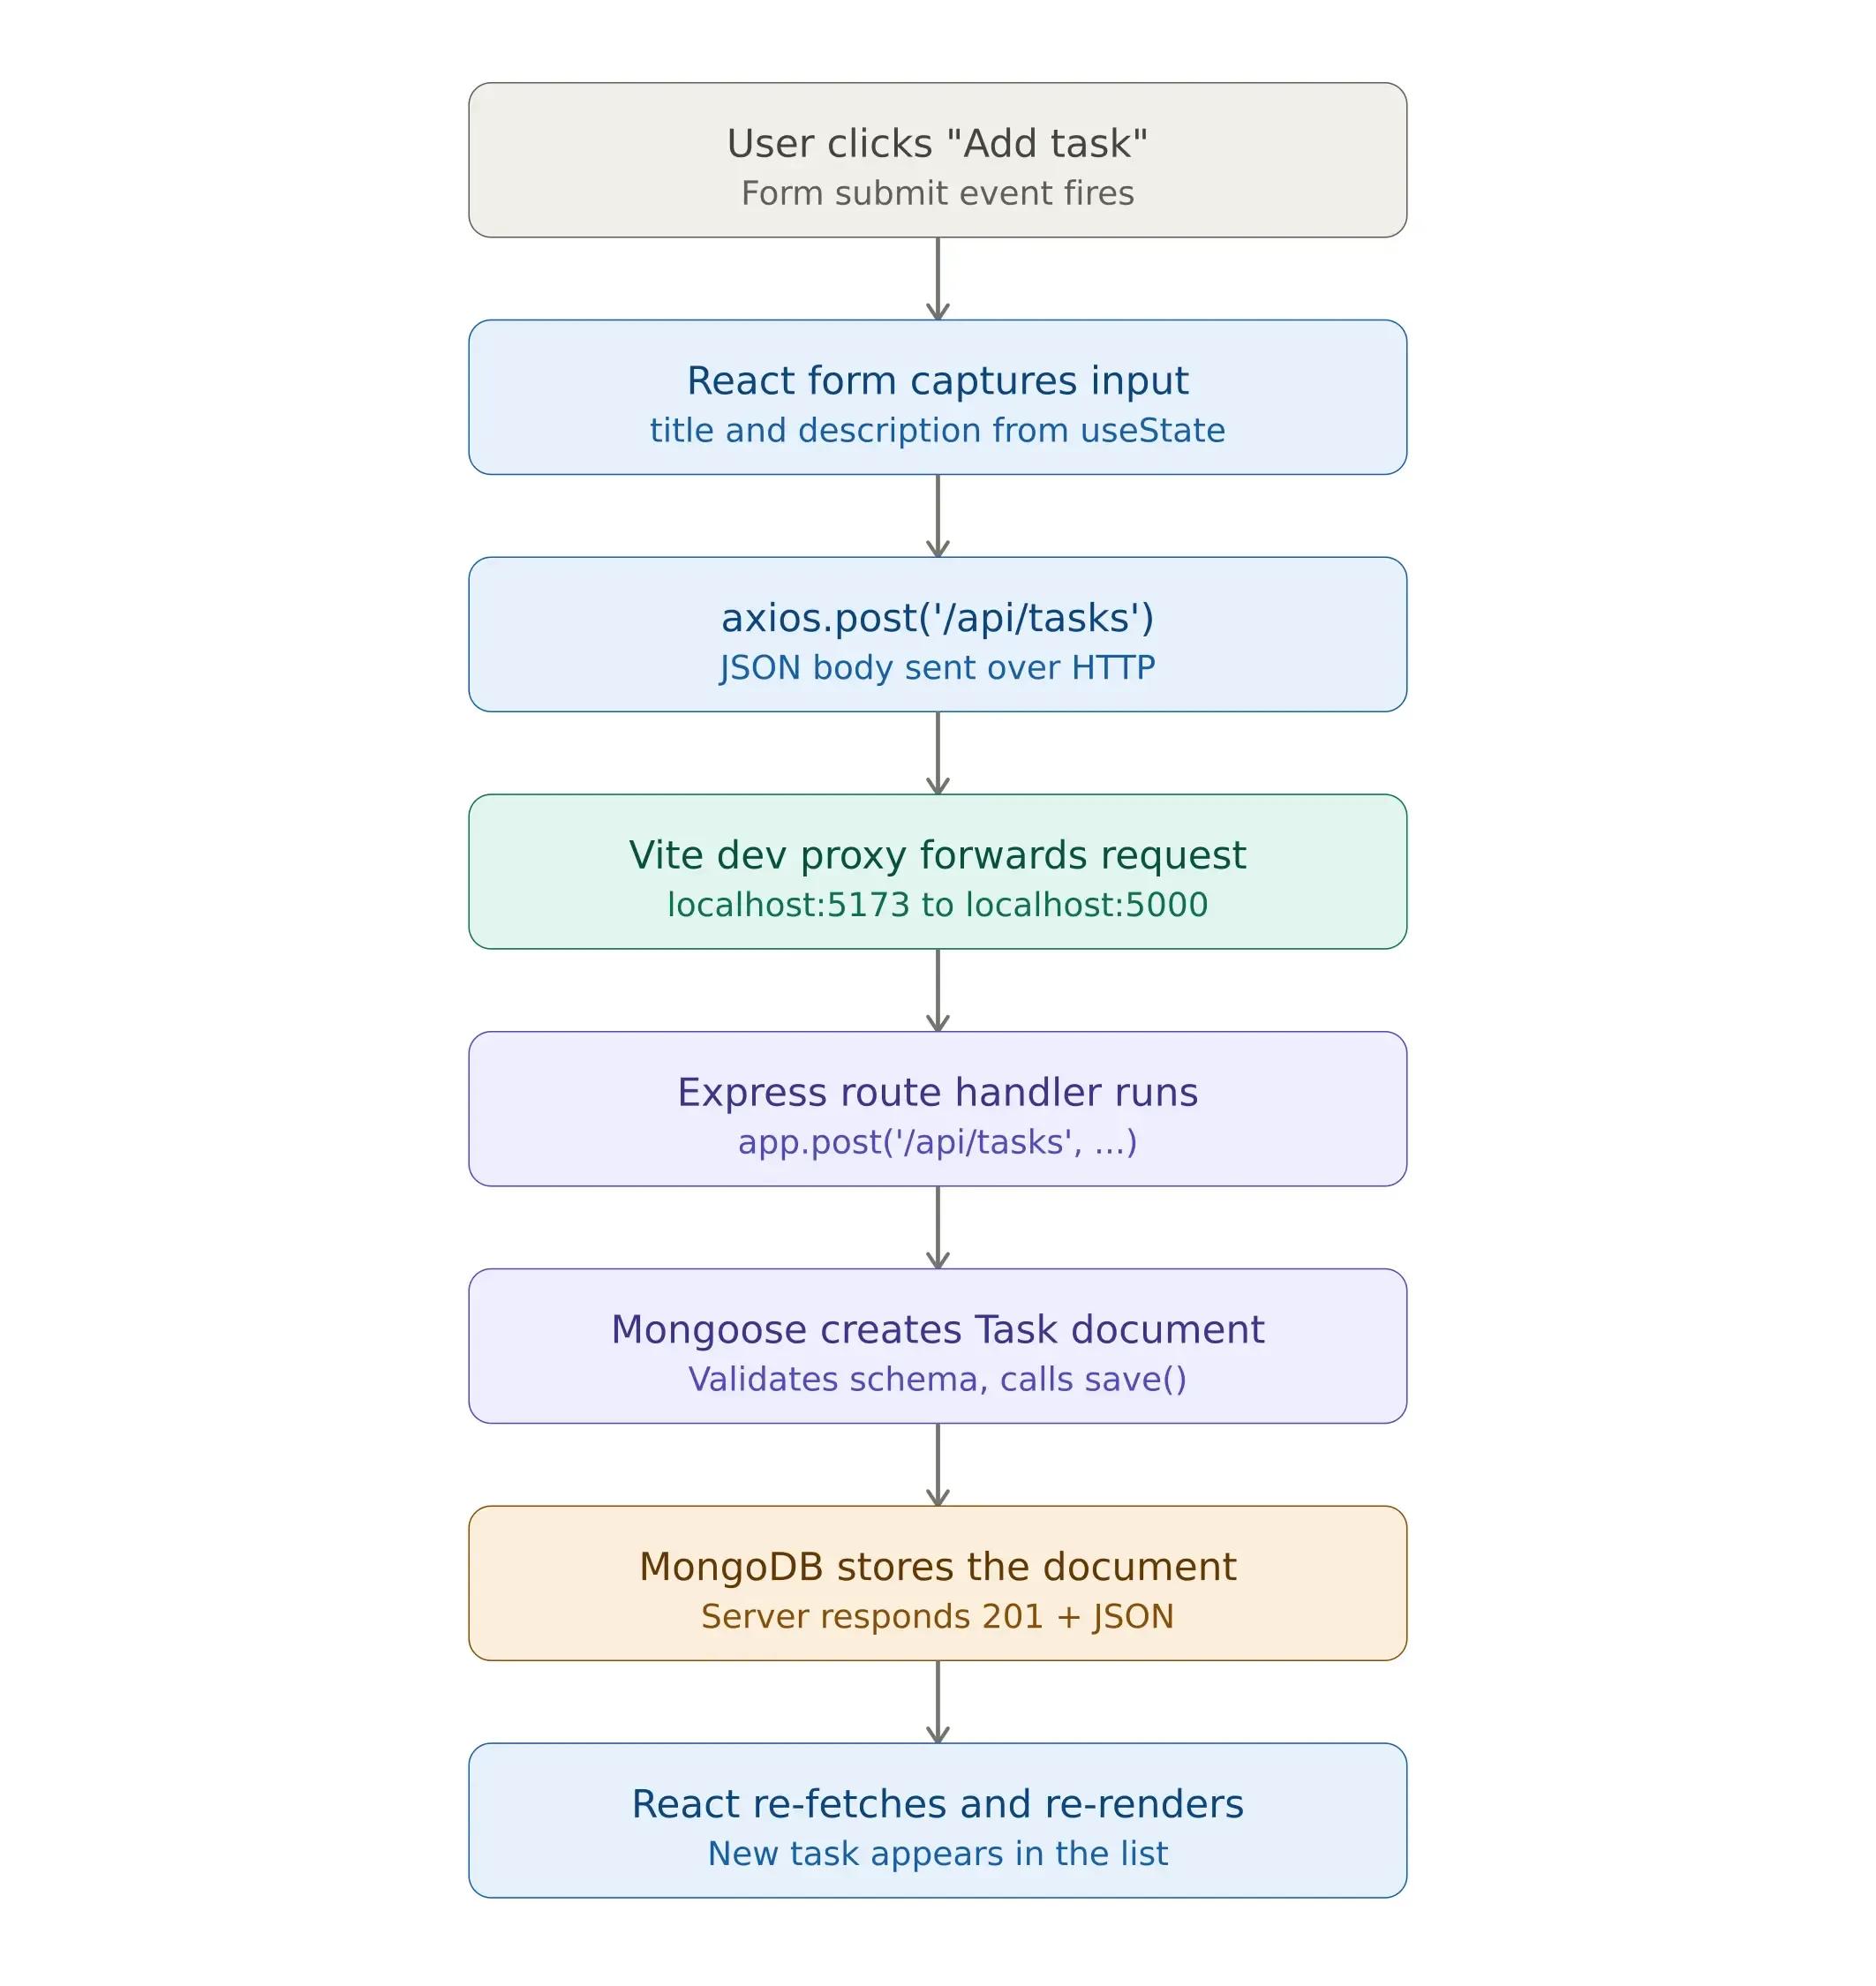
This lifecycle repeats for each CRUD operation, using different HTTP methods and route handlers. Keep this flow in mind as we build each piece. It will make everything click into place.
Let us start with the frontend.
Setting Up the React Frontend
We will use Vite to build our React app. Vite has become the standard build tool for React projects in 2026, and for good reason. Its development server starts almost instantly, and its hot module replacement is significantly faster than older alternatives like Create React App.
mkdir task-manager
cd task-manager
npm create vite@latest client -- --template react
cd client
npm install
npm install axios
We are installing axios to make HTTP requests to our backend. Although you can use the browser's fetch API, axios offers a simpler syntax. It helps with request interceptors, automatic JSON parsing, and consistent error handling in different environments. Plus, it makes your code cleaner. On most projects our React developers work on, axios is the default choice for API communication.
Now, let us build the component that will handle all our task interactions.
Creating the Task Component
The TaskList component is where the frontend meets the backend. It handles fetching tasks from the API, submitting new tasks, updating status, and deleting tasks. All four CRUD operations live in a single component.
Before looking at the code, here are the key architectural decisions and why they matter:
useState for local form state. The title and description inputs are controlled components, meaning React manages their values directly. This gives you full control over validation, submission behavior, and form resets after a successful submission.
useEffect for initial data loading. When the component first mounts, fetchTasks runs once and populates the task list from the API. The empty dependency array [] ensures this only fires on the initial render, not on every state change.
Re-fetching after mutations. After every create, update, or delete operation, the component calls fetchTasks() again to get the latest data from the server. This is a simple and reliable approach. For applications where performance is critical, you might need optimistic updates or client-side caching with libraries like TanStack Query. However, for the majority of use cases, re-fetching serves as the ideal initial approach.
Standard REST conventions. The component maps user actions directly to HTTP methods: GET to read, POST to create, PUT to update, and DELETE to remove. This one-to-one mapping keeps the code predictable and easy to debug.
With that context, here is the component.
Create a new file at client/src/components/TaskList.jsx:
import { useState, useEffect } from 'react';
import axios from 'axios';
function TaskList() {
  const [tasks, setTasks] = useState([]);
  const [title, setTitle] = useState('');
  const [description, setDescription] = useState('');
  useEffect(() => {
    fetchTasks();
  }, []);
  async function fetchTasks() {
    const response = await axios.get('/api/tasks');
    setTasks(response.data);
  }
  async function addTask(e) {
    e.preventDefault();
    await axios.post('/api/tasks', { title, description });
    setTitle('');
    setDescription('');
    fetchTasks();
  }
  async function deleteTask(id) {
    await axios.delete(/api/tasks/${id});
    fetchTasks();
  }
  async function updateStatus(id, status) {
    await axios.put(/api/tasks/${id}, { status });
    fetchTasks();
  }
  return (
    <div style={{ maxWidth: '600px', margin: '0 auto', padding: '20px' }}>
      <h1>Task Manager</h1>
      <form onSubmit={addTask}>
        <input
          value={title}
          onChange={(e) => setTitle(e.target.value)}
          placeholder="Task title"
          required
        />
        <input
          value={description}
          onChange={(e) => setDescription(e.target.value)}
          placeholder="Description"
        />
        <button type="submit">Add Task</button>
      </form>
      <ul>
        {tasks.map(task => (
          <li key={task._id}>
            <strong>{task.title}</strong> - {task.description}
            <span> [{task.status}]</span>
            <button onClick={() => deleteTask(task._id)}>Delete</button>
            <select
              value={task.status}
              onChange={(e) => updateStatus(task._id, e.target.value)}
            >
              <option value="todo">Todo</option>
              <option value="in-progress">In Progress</option>
              <option value="done">Done</option>
            </select>
          </li>
        ))}
      </ul>
    </div>
  );
}
export default TaskList;
At this point, the frontend is ready to communicate with an API. But there is no API yet. Let us build that now.
Building the REST API with Node.js and Express
You've got a frontend that can render a nice UI and respond to user clicks, but right now it has nowhere to send that data. If someone creates a task and refreshes the page, it's gone. You need something that can receive those requests, save them to a database, and return the appropriate response. That's exactly what we're building now with Node.js and Express. Node.js is well-suited for this layer because its non-blocking, event-driven I/O model handles concurrent requests efficiently, which is a requirement for any application serving multiple users simultaneously.
Go back to the project root and set up the server:
cd ..
mkdir server
cd server
npm init -y
npm install express mongoose cors dotenv
npm install -D nodemon
Before we write any server code, let us understand what each of these packages does and why we need them. This is important because choosing the wrong dependencies or not understanding what they do can lead to debugging sessions that could have been avoided.
- express is the web framework. It handles HTTP routing, middleware pipelines, and response formatting. Express follows a minimalist philosophy: it gives you just enough structure to build REST APIs without imposing rigid conventions. This is one of the reasons it remains the dominant framework for Node.js backend development. For more on Express architecture, see the official documentation.
- mongoose is an Object-Document Mapper (ODM) for MongoDB. It provides schema-based modeling, connection management, validation, type casting, and query building. Without Mongoose, you would write raw MongoDB driver code, which is functional but significantly more verbose for CRUD-heavy applications. If you want, you can read the Mongoose documentation to understand schema design patterns in depth.
- cors handles Cross-Origin Resource Sharing. During development, the React app runs on port 5173 (Vite's default), and Express runs on port 5000. Browsers block cross-origin requests by default as a security measure. The CORS middleware tells the browser that these requests are intentional and permitted.
- dotenv loads environment variables from a .env file into process.env. This keeps sensitive configuration, like database URIs, JWT secrets, and API keys, out of your source code. Never hardcode credentials. This is non-negotiable for any production application.
- nodemon watches for file changes during development and automatically restarts the server. It is a dev dependency only and should never ship to production.
Now, when a request arrives at our Express server, it passes through a series of middleware functions before reaching the route handler. Understanding this pipeline is essential for debugging:
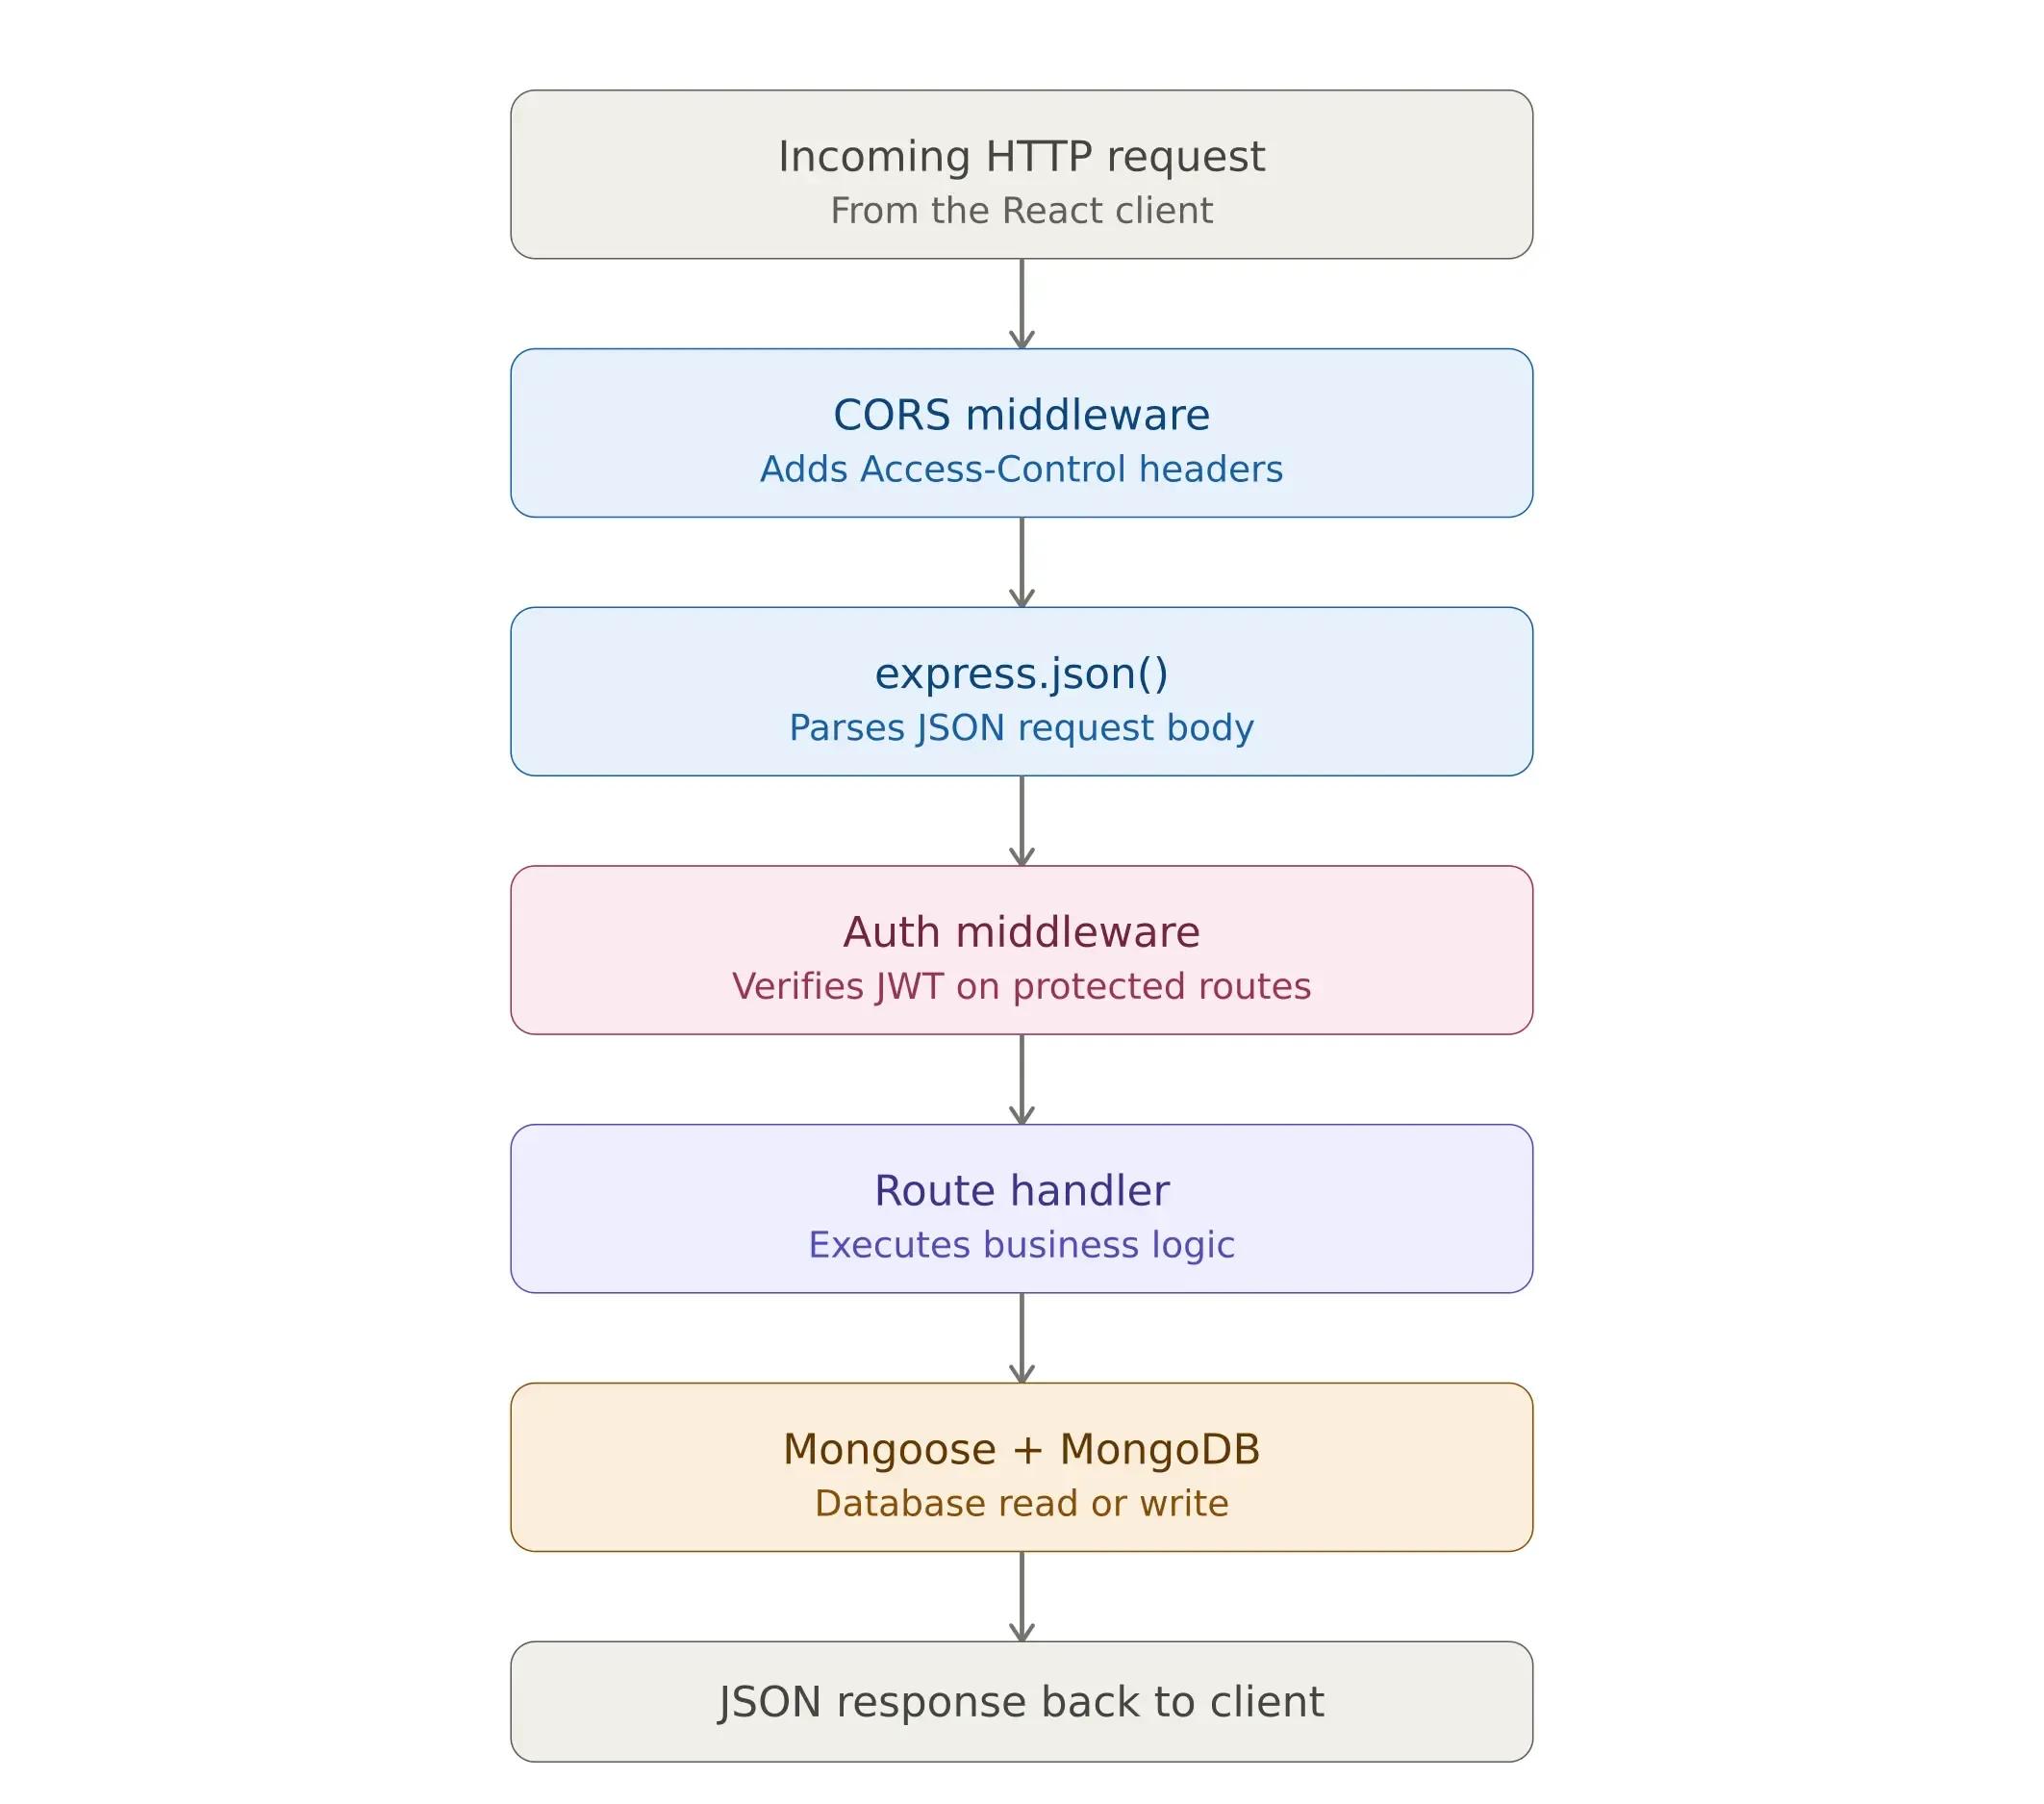
With that mental model in place, let us write the server.
Creating the Express Server
The file below contains everything: database connection, data model, and all four CRUD endpoints. In a production application, you would typically separate these into different files with models in one directory, routes in another, and controllers in a third. But a single file makes it easy to see how the pieces fit together in the architecture.
Create server/index.js:
const express = require('express'); const mongoose = require('mongoose'); const cors = require('cors'); require('dotenv').config();const app = express(); app.use(cors()); app.use(express.json());
// Connect to MongoDB mongoose.connect(process.env.MONGODB_URI) .then(() => console.log('Connected to MongoDB')) .catch(err => console.error('MongoDB connection error:', err));
// Task Model const taskSchema = new mongoose.Schema({ title: { type: String, required: true }, description: { type: String, default: '' }, status: { type: String, default: 'todo', enum: ['todo', 'in-progress', 'done'] } }, { timestamps: true });
const Task = mongoose.model('Task', taskSchema);
// API Routes app.get('/api/tasks', async (req, res) => { const tasks = await Task.find().sort({ createdAt: -1 }); res.json(tasks); });
app.post('/api/tasks', async (req, res) => { const task = new Task(req.body); await task.save(); res.status(201).json(task); });
app.put('/api/tasks/:id', async (req, res) => { const task = await Task.findByIdAndUpdate(req.params.id, req.body, { new: true }); res.json(task); });
app.delete('/api/tasks/:id', async (req, res) => { await Task.findByIdAndDelete(req.params.id); res.json({ message: 'Task deleted' }); });
const PORT = process.env.PORT || 5000; app.listen(PORT, () => console.log(Server running on port ${PORT}));
A few things worth noting in the schema definition. The enum validator on the status field restricts values to exactly three options: todo, in-progress, and done. If any other value is submitted, Mongoose throws a validation error before it ever reaches MongoDB. This ensures server-side data integrity. And it should always exist alongside any frontend validation because API endpoints can be called directly, bypassing the UI entirely.
The { timestamps: true } option automatically adds createdAt and updatedAt fields to every document. This eliminates manual date management and gives you audit-ready timestamps for free.
For organizations working with complex data models, experienced MongoDB developers who understand indexing strategies, aggregation pipelines, and schema design patterns become essential as datasets grow.
Environment Variables
Create a .env file in the server folder:
MONGODB_URI=mongodb://localhost:27017/taskmanager
PORT=5000
If you do not have MongoDB installed locally, MongoDB Atlas offers a free tier with 512 MB of storage, which is more than enough for development and early-stage production. It handles provisioning, automated backups, and monitoring out of the box.
Now we have a React frontend and an Express backend, but they are running on different ports. We need to connect them.
Connecting React to the Backend
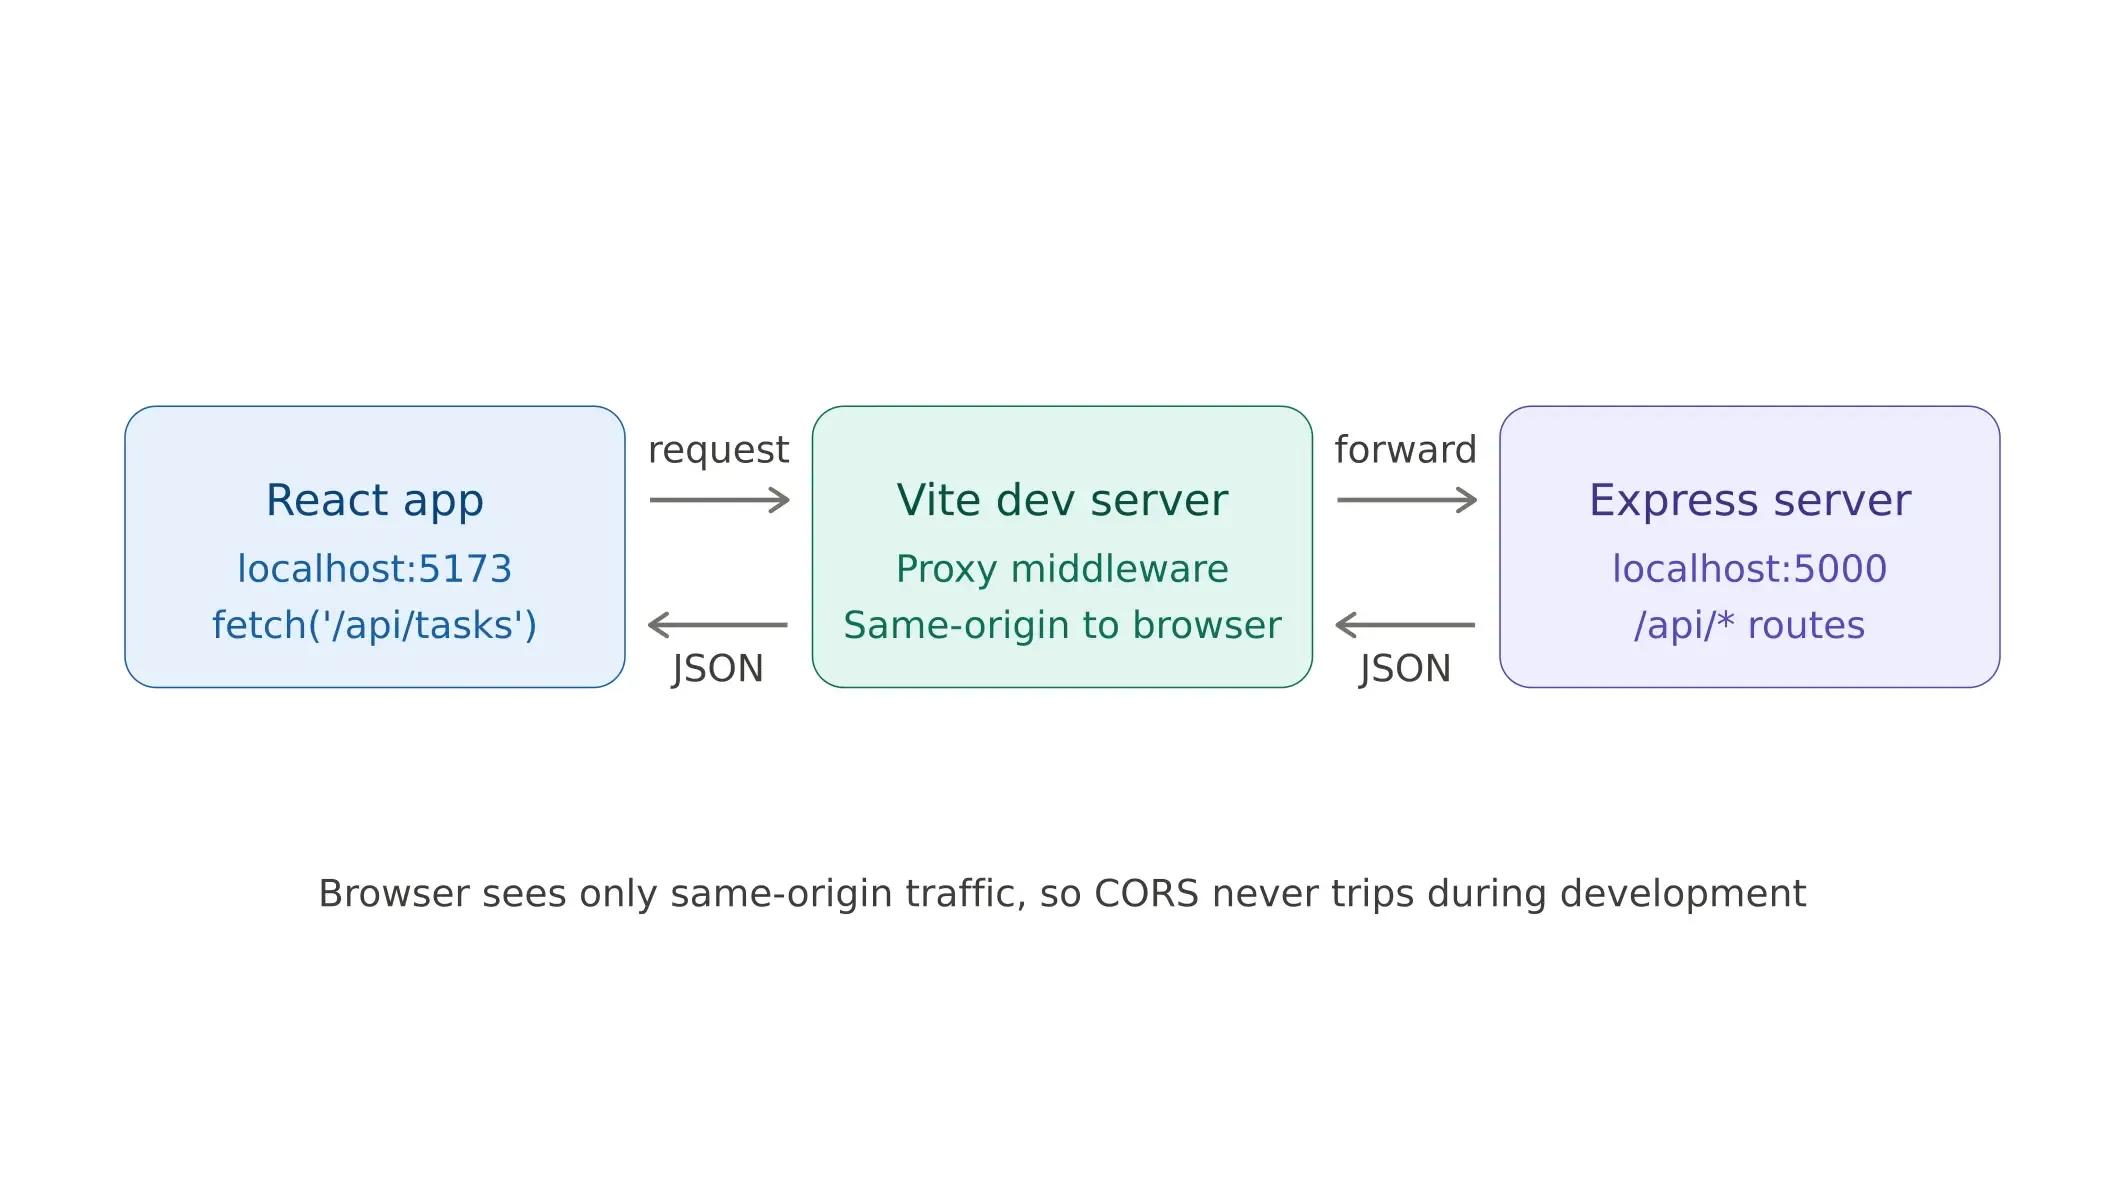
Right now, React is running on port 5173, and Express is on port 5000. The browser sees these as two separate origins and blocks requests between them. The simplest fix to avoid CORS issues during development is to add a proxy in your Vite config so that all API requests are automatically forwarded to Express.
Open client/vite.config.js:
import { defineConfig } from 'vite';
import react from '@vitejs/plugin-react';
export default defineConfig({
 plugins: [react()],
 server: {
   proxy: {
     '/api': 'http://localhost:5000'
   }
 }
});
Now, when the React app makes a request to /api/tasks, Vite will forward it to the Express server running on port 5000. So there will be no CORS issues at all. It is a development-only convenience. In production, you would either serve both layers from the same domain or explicitly configure CORS.
Here is how the proxy works:
At this point, the core application works. You can create, view, update the status of, and delete tasks. But for anything beyond a personal project, you need authentication. Let us add that next.
Adding Authentication with JWT Tokens
How Does JWT Authentication Work in a Full-Stack App?
For any application handling user-specific data, authentication is non-negotiable. JSON Web Tokens (JWT) are the standard approach for stateless API authentication, and understanding how they work across both the frontend and backend is basic knowledge for full-stack development.
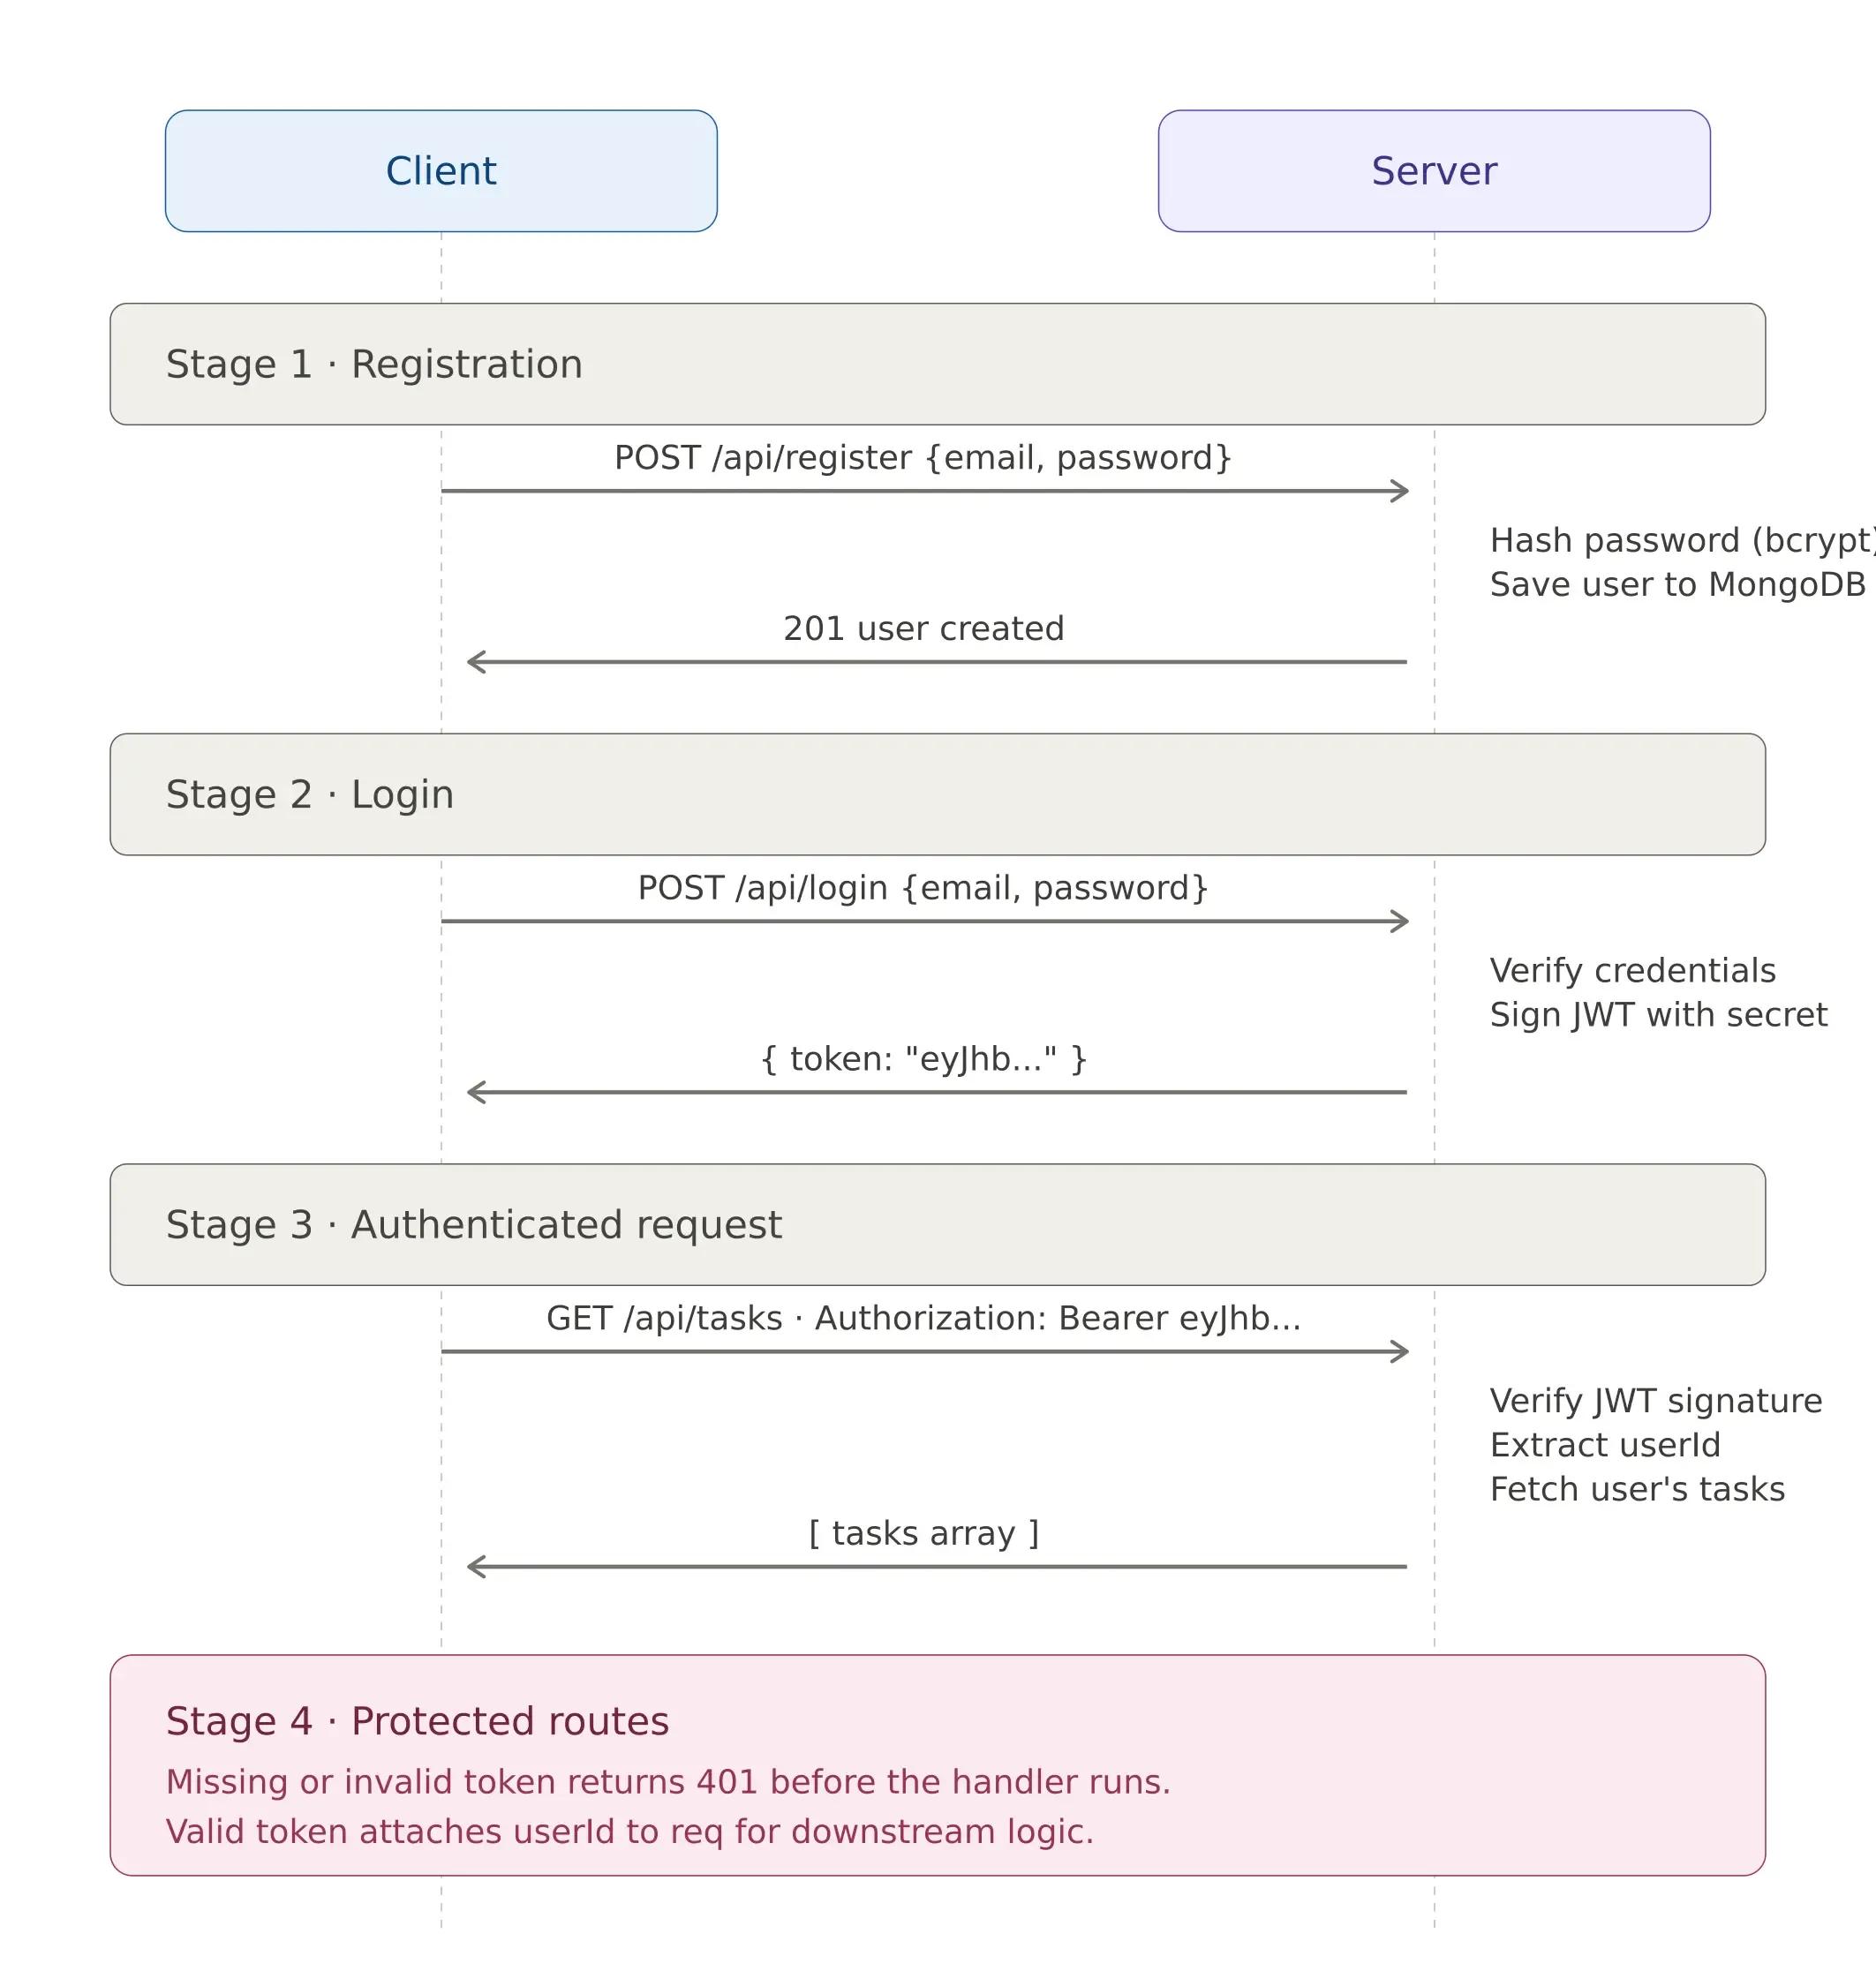
The authentication flow has four stages:
Stage 1: Registration. The user submits an email and a password. The server hashes the password using bcrypt (plain-text password storage is a critical security vulnerability) and saves the user document to MongoDB.
Stage 2: Login. The user provides their credentials again. The server looks up the email, compares the submitted password against the stored hash, and if everything matches, generates a JWT. This token contains the user's ID and is signed with a secret key known only to the server.
Stage 3: Authenticated requests. The frontend stores the JWT and includes it in the Authorization header of every subsequent API request. The auth middleware on the server retrieves the token, verifies its signature, and attaches the user's ID to the request object, making it available to route handlers.
Stage 4: Protected routes. Any route that requires authentication runs through the middleware first. If the token is missing, expired, or tampered with, the request is rejected with a 401 status before it ever reaches the route handler.
Here’s the complete flow:
Here is a simplified version of how to add it:
Install the required packages:
npm install jsonwebtoken bcryptjsThen add a User model and authentication routes to your server:
const jwt = require('jsonwebtoken'); const bcrypt = require('bcryptjs');// User model const userSchema = new mongoose.Schema({ email: { type: String, required: true, unique: true }, password: { type: String, required: true } }); const User = mongoose.model('User', userSchema);
// Register app.post('/api/register', async (req, res) => { const { email, password } = req.body; const hashedPassword = await bcrypt.hash(password, 10); const user = new User({ email, password: hashedPassword }); await user.save(); res.status(201).json({ message: 'User created' }); });
// Login app.post('/api/login', async (req, res) => { const { email, password } = req.body; const user = await User.findOne({ email }); if (!user || !(await bcrypt.compare(password, user.password))) { return res.status(401).json({ error: 'Invalid credentials' }); } const token = jwt.sign({ userId: user._id }, process.env.JWT_SECRET); res.json({ token }); });
// Middleware to protect routes function authMiddleware(req, res, next) { const token = req.headers.authorization?.split(' ')[1]; if (!token) return res.status(401).json({ error: 'No token' }); try { const decoded = jwt.verify(token, process.env.JWT_SECRET); req.userId = decoded.userId; next(); } catch { res.status(401).json({ error: 'Invalid token' }); } }
The implementation above covers the core authentication pattern. For production, you would also want token expiration (set an expiresIn option when signing the JWT), refresh token rotation for seamless session persistence, input validation and rate limiting on auth endpoints, and secure client-side token storage. The JWT documentation covers these advanced patterns in depth.
Building secure authentication is one of the areas where experience matters most. If your team needs backend developers who have implemented JWT, OAuth, and session management in production, that specialization helps prevent the security vulnerabilities that commonly arise in authentication code written without deep domain knowledge.
With authentication in place, our application is functionally complete. The last step is getting it into production.
What Is the Best Way to Deploy a Full-Stack React and Node.js App?
Deploying a full-stack application is different from deploying a static website. You have three separate layers (frontend, backend, and database), and each one has different hosting requirements. The modern deployment landscape offers specialized platforms that handle this well.
Here is the deployment strategy we recommend:
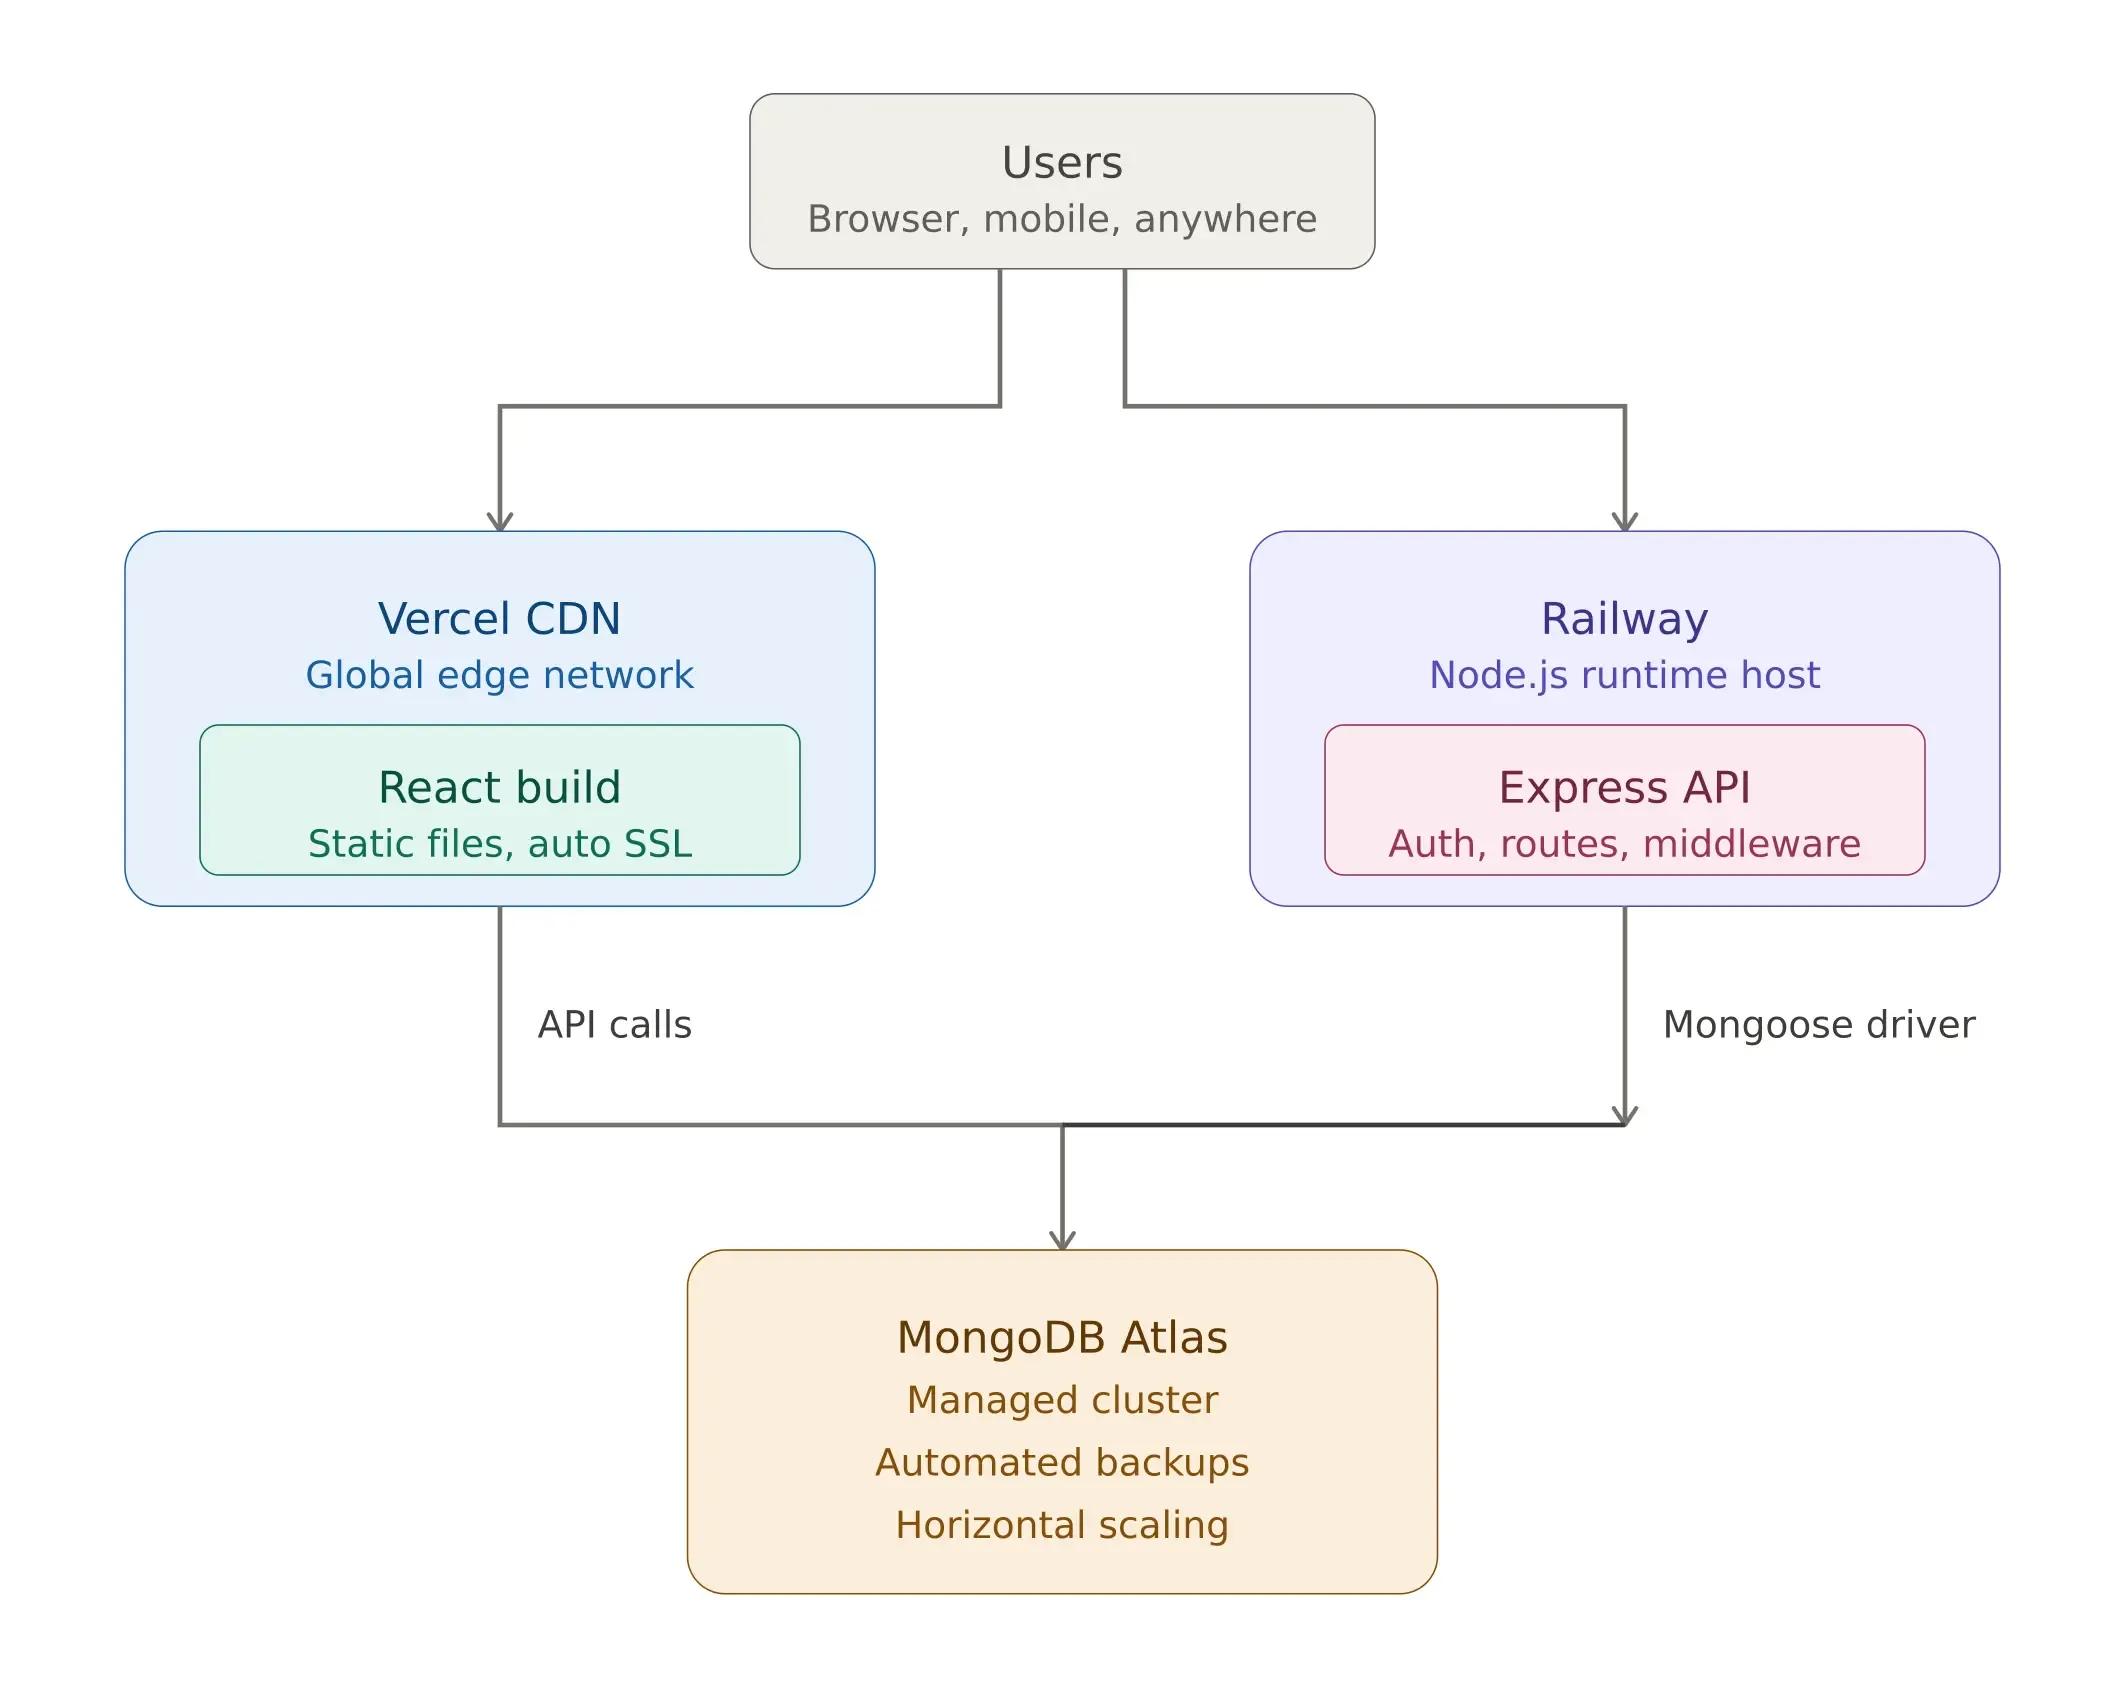
Frontend → Vercel. Vercel is built for frontend frameworks. Push your client folder to GitHub and connect it to Vercel. It handles build optimization, SSL certificates, CDN distribution, and automatic deployments on every push. For React applications, you will see fast global load times without any additional configuration.
Backend → Railway. Railway makes Node.js deployment simple. Push your server folder, and Railway auto-detects the runtime, installs dependencies, and starts the server. It also offers managed databases, which can further simplify your infrastructure.
Database → MongoDB Atlas. MongoDB Atlas provides managed clusters with automated backups, performance monitoring, and horizontal scaling. Start with the free tier for development, and scale storage and compute independently as your user base grows.
Here is what the production architecture looks like:
One critical reminder: when deploying, set your environment variables (MONGODB_URI, JWT_SECRET, PORT) in your hosting platform. Never commit .env files to version control. Add .env to your .gitignore to prevent accidental credential exposure.
Need a Full-Stack Development Team?
Building a full-stack application means integrating frontend interfaces, backend APIs, database architecture, authentication, and deployment infrastructure. Getting each layer right and ensuring they work together requires years of experience.
At Softaims, our engineering teams have shipped full-stack React and Node.js applications to production across multiple industries. Whether you need to augment your existing team or build a dedicated team from scratch, we provide vetted developers who integrate with your workflow from day one.
Looking to build with this stack?
Hire React Developers →
Jordan G.
My name is Jordan G. and I have over 4 years of experience in the tech industry. I specialize in the following technologies: HTML, JavaScript, Bootstrap, WordPress, React, etc.. I hold a degree in Associate of Science (AS). Some of the notable projects I’ve worked on include: Proabition – Speakeasy-Inspired Website Design, Minimalist WordPress Website for Academic Portfolio, Casa Mia Group, Estrella Taqueria Lounge, Cyber Rental Properties, etc.. I am based in Phoenix, United States. I've successfully completed 12 projects while developing at Softaims.
I am a dedicated innovator who constantly explores and integrates emerging technologies to give projects a competitive edge. I possess a forward-thinking mindset, always evaluating new tools and methodologies to optimize development workflows and enhance application capabilities. Staying ahead of the curve is my default setting.
At Softaims, I apply this innovative spirit to solve legacy system challenges and build greenfield solutions that define new industry standards. My commitment is to deliver cutting-edge solutions that are both reliable and groundbreaking.
My professional drive is fueled by a desire to automate, optimize, and create highly efficient processes. I thrive in dynamic environments where my ability to quickly master and deploy new skills directly impacts project delivery and client satisfaction.
Leave a Comment
Need help building your team? Let's discuss your project requirements.
Get matched with top-tier developers within 24 hours and start your project with no pressure of long-term commitment.