React Hooks Explained: useState, useEffect, and Custom Hooks
React Hooks replaced class components as the standard way to manage state and side effects in React. But knowing the API is not the same as knowing how to use React Hooks well. This guide covers all you need to learn about React hooks.
Technically reviewed by:
Andres R.|Sabrina D.
Table of contents
Key Takeaways
- React Hooks let you use state and lifecycle features in functional components. No more class boilerplate, this binding, or scattered lifecycle methods.
- The dependency array in useEffect is where most bugs come from. Missing dependencies cause stale data. Including the wrong ones causes infinite loops. Understanding this single concept prevents 80% of React Hooks issues.
- Custom hooks are plain functions that call other hooks. If you find yourself copying the same useState + useEffect pattern across components, extract it. One function, tested once, reused everywhere.
- React Hooks track state by call order, not variable names. This is why hooks cannot go inside if statements or loops. Break this rule and React silently assigns state to the wrong variable.
- useMemo and useCallback are optimization tools, not defaults. Both have overhead. Profile first, then memoize the specific bottleneck. Wrapping everything slows your app down, not speeds it up.
- React Hooks with TypeScript eliminate most interface boilerplate. Types are inferred from useState defaults. Utility types like Omit, Pick, and Partial handle the rest without redundant interfaces.
React Hooks changed how we write React applications. Before hooks were introduced in React 16.8, any component that needed state or lifecycle behavior had to be a class. That meant verbose constructors, confusing this binding, and stateful logic that was nearly impossible to share between components.
React Hooks solved all three problems. You can use state, side effects, context, and other React features right inside functional components. No classes are needed. The result is code that is shorter, easier to read, and much easier to keep up with. This is why React hooks are now the standard approach in modern React development.
I have been using React Hooks since they were released, and after building dozens of production apps with them, I want to share the patterns and mistakes I have encountered. In this guide, we will walk through the hooks you will use in 90% of real-world React projects, with React Hooks examples you can apply directly. I will also cover the most common mistakes we see in production codebases, the mental-model shift that makes hooks click, and how hooks interact with TypeScript in modern development workflows.
I expect you already know the basics of React. If you need a refresher, our React tutorial for beginners covers the foundation, and the official React documentation is another great place to start.
What Are React Hooks? (The Problem They Solve)
Before we look into each React hook, it is worth understanding why they exist. Hooks are JavaScript functions that let you "hook into" React's internal systems, such as state management, component lifecycle, and context, from within a functional component. Before React hooks, these capabilities were only available in class components.
How class components worked before React hooks
In the class component model, React created a single instance of your component and called specific lifecycle methods on that same instance as the component moved through its lifecycle. The flow looked like this:
Mounting phase: React called constructor() to initialize state, then render() to produce JSX, then componentDidMount() after the component appeared in the DOM. This is the "render phase" (pure, no side effects) followed by the "commit phase" (where you could safely interact with the DOM, fetch data, and trigger side effects).
Updating phase: The updating phase happened when props changed through setState() or new props came from a parent. React then called render() again, updated the DOM, and then called componentDidUpdate(). You had to split the logic for the same problem, like setting up a data subscription and updating it when props changed, across these different methods.
Unmounting phase: When the component was removed, React called componentWillUnmount() for cleanup. Any teardown logic lived here, often far from the setup logic it was paired with.
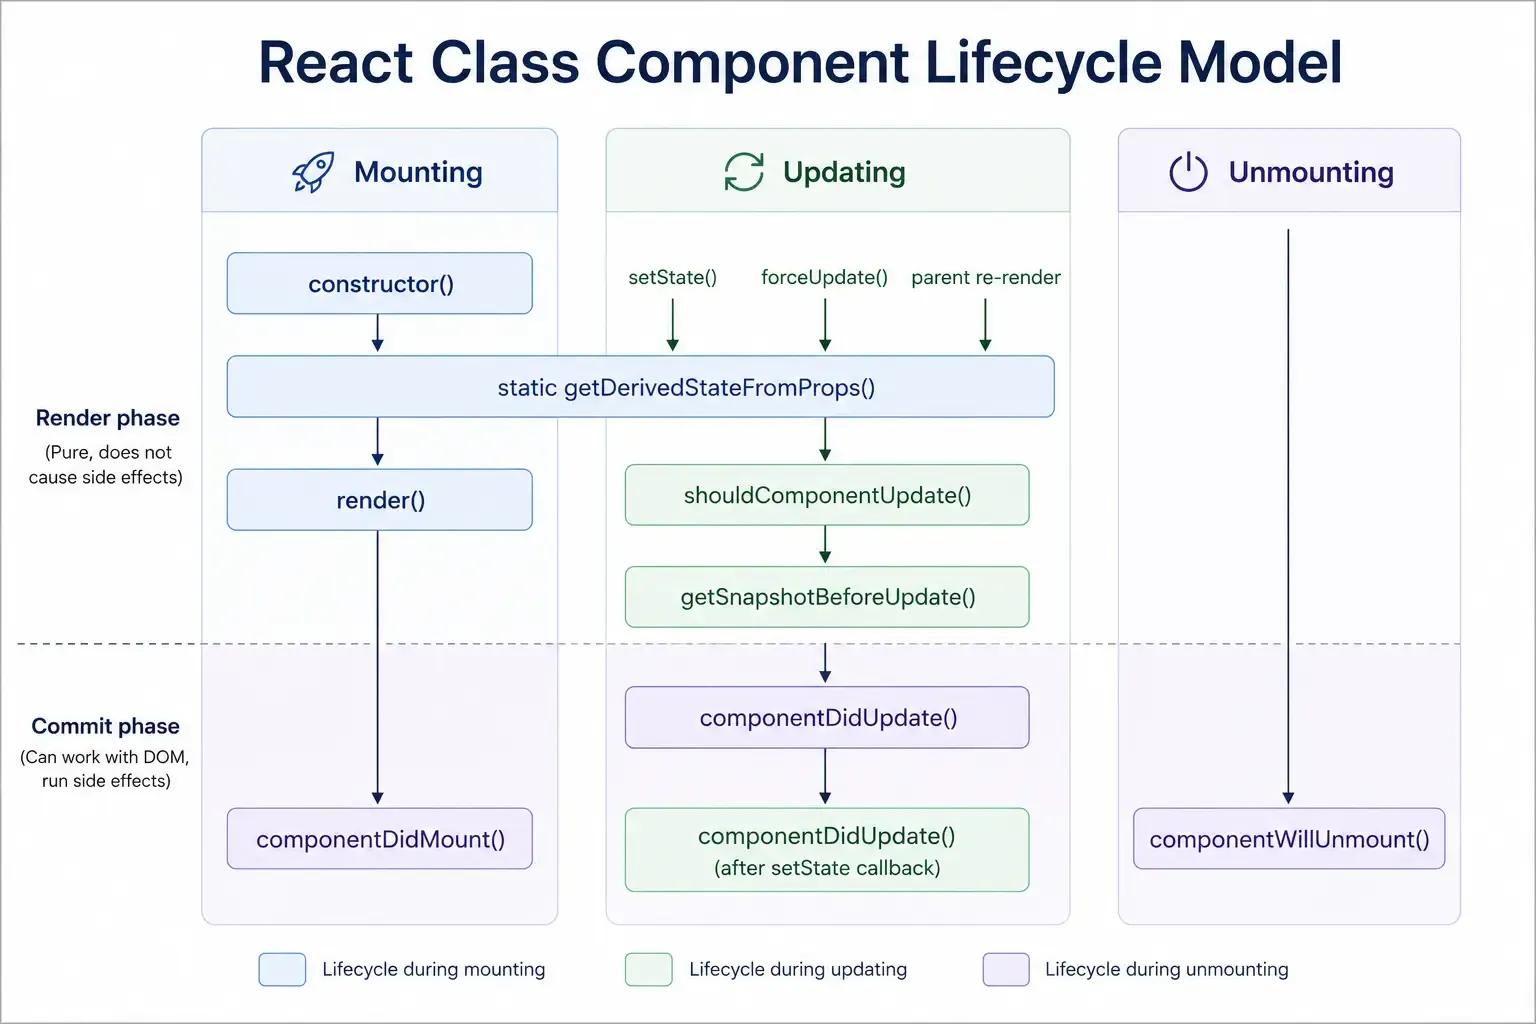
This separation created a structural problem. A single concern, like fetching data by user ID, required code in three different lifecycle methods: initial fetch in componentDidMount, re-fetch on ID change in componentDidUpdate, and request cancellation in componentWillUnmount. The code for one feature was spread across the component.
How Reack hooks changed the architecture
Before hooks, React components came in two types:
- Class-based container components that managed state and side effects.
- Functional presentational components that got data through props and displayed UI.
Container components handled the logic, while presentational components handled the look.
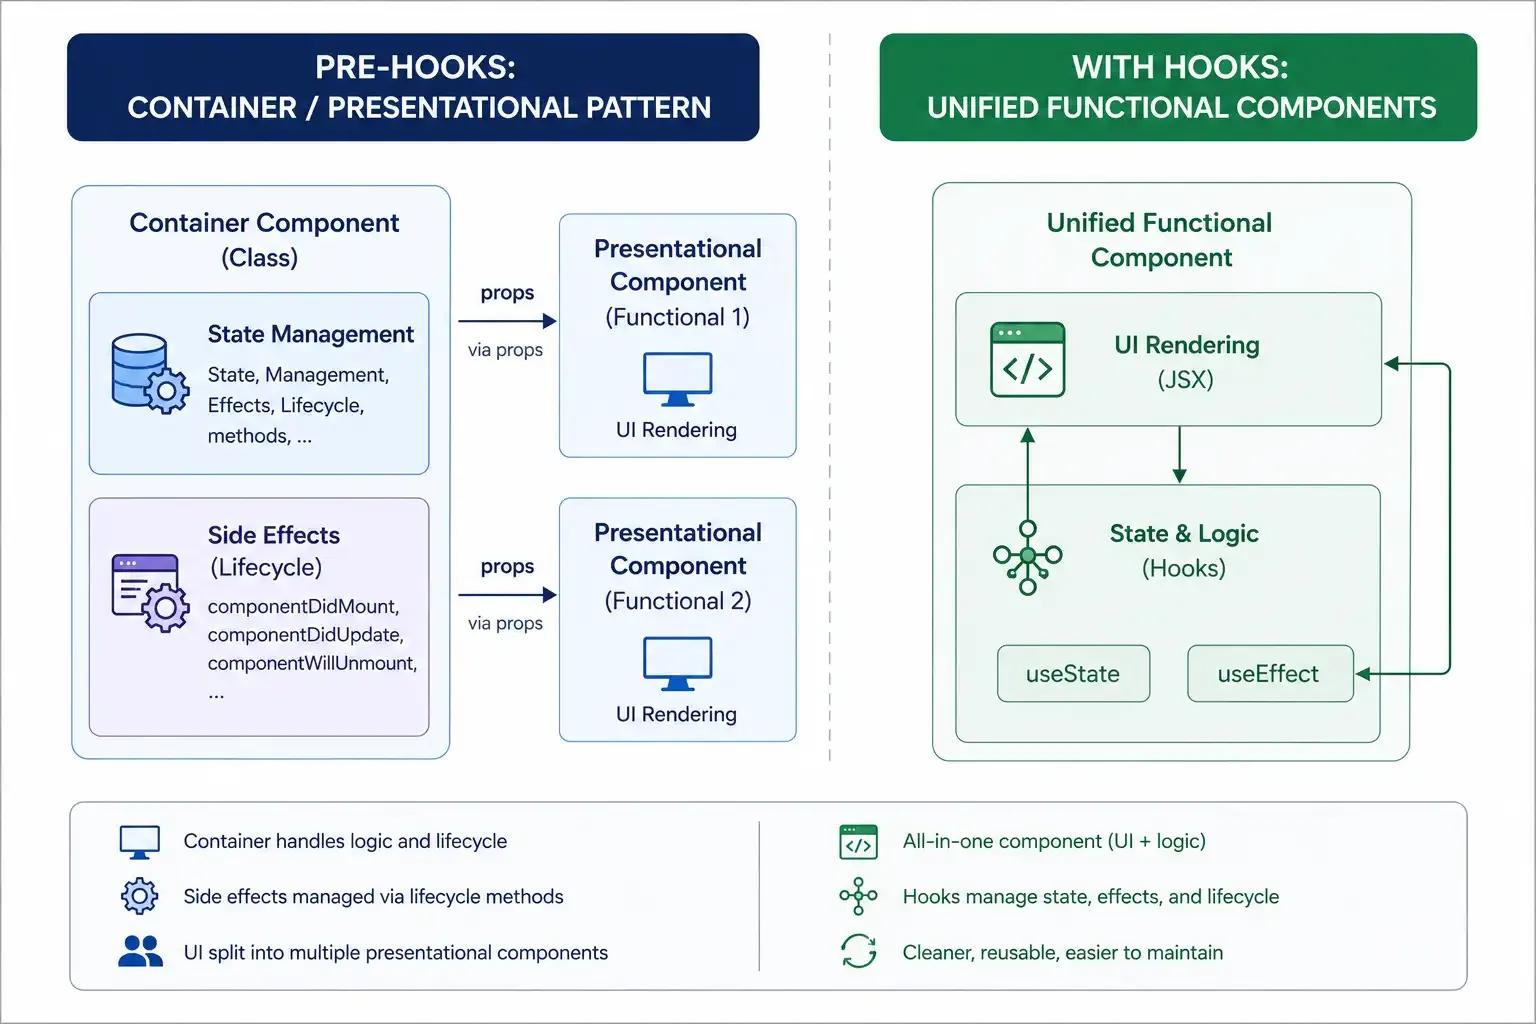
This separation was supposed to work, but it actually caused problems. As requirements grew, basic presentation components often required distinct states or side effects, prompting developers to convert them into classes. This process of upgrading took a long time and made things more complicated than they needed to be.
With React Hooks we got rid of that distinction. A functional component can now handle both state management and UI rendering. The language no longer enforces the container vs. presentational split. Now you can organize your code based on concerns rather than component type.
To see the difference in code, consider a simple counter. Before React hooks:
class Counter extends React.Component {
  constructor(props) {
    super(props);
   this.state = { count: 0 };
 }
 render() {
   return (
     <button onClick={() => this.setState({ count: this.state.count + 1 })}>
       Count: {this.state.count}
     </button>
   );
 }
}
That is a lot of code for a counter. With React Hooks:
function Counter() {
 const [count, setCount] = useState(0);
 return (
   <button onClick={() => setCount(count + 1)}>
     Count: {count}
   </button>
 );
}
Fewer lines, yes. But React hooks solve three deeper structural problems that made class components difficult to work with at scale.
Sharing stateful logic was painful. If two components needed the same behavior, such as tracking window size or managing form validation, you had to use higher-order components (HOCs) or render props. Both patterns added layers of nesting, making the code harder to follow. React custom hooks now let you extract that logic into a plain function and reuse it anywhere, without changing your component hierarchy.
Related logic was scattered across lifecycle methods. A single concern, such as subscribing to a data source and cleaning up that subscription, had to be split across componentDidMount, componentDidUpdate, and componentWillUnmount. With React hooks, setup and teardown live together inside a single useEffect call. You can see at a glance which codes belong together.
The this keyword caused real bugs. In JavaScript, this behaves differently from most other languages, and class components require developers to remember to bind event handlers. If you forget to bind, you'll get a silent undefined at runtime. React Hooks sidestep this entirely, removing a common source of production bugs.
If you are building a full-stack application with React on the front end, understanding hooks is not optional. It is a prerequisite for writing UI code. So now let’s take a detailed look at types of hook in React, starting with the one you’ll use most often.
useState: Managing State the Modern Way
useState is the most basic hook. You call it with an initial value, and it returns two things: the current state and a function to update it.
const [value, setValue] = useState(initialValue);
When you call setValue, React schedules a re-render of the component with the new state. The component function runs again, and value now holds the updated data.
One detail worth noting early: the initialValue argument is only used during the first render. On subsequent renders, React ignores it and returns the current state. If computing the initial value is expensive, for example, reading from a large dataset, you can pass a function instead. React will only call it once:
const [data, setData] = useState(() => computeExpensiveDefault());This is called lazy initialization, and it prevents the expensive computation from running on every render.
Let's walk through the patterns that come up most often in real projects.
Managing Form Inputs
Each input field gets its own state variable, and changes are captured through onChange handlers:
function LoginForm() { const [email, setEmail] = useState(''); const [password, setPassword] = useState('');function handleSubmit(e) { e.preventDefault(); console.log('Login:', email, password); }
return ( <form onSubmit={handleSubmit}> <input type="email" value={email} onChange={(e) => setEmail(e.target.value)} /> <input type="password" value={password} onChange={(e) => setPassword(e.target.value)} /> <button type="submit">Log In</button> </form> ); }
Working with Objects in State
This is where we most often see bugs in code reviews. The useState setter replaces the entire value, so when your state is an object, you need to spread the previous state when updating. Otherwise, you will lose the other properties.
const [user, setUser] = useState({ name: '', age: 0 });// Correct - spread previous state setUser({ ...user, name: 'Sarah' });
// Wrong - this replaces the entire object setUser({ name: 'Sarah' }); // age is now gone
Now you might be wondering whether to make separate useState calls for each field or put all the related state into one object. When there are many fields on a form, grouping related values in a single state object keeps the code neat and makes it easier to track fewer state variables. Separate useState calls make sense when you have two independent components of state, like a toggle and a counter, that are unrelated.
Updating State Based on the Previous Value
When the next state depends on the current state, pass a function to the setter instead of a direct value. This ensures accuracy even when React batches multiple updates together:
// Correct: uses functional update
setCount(prev => prev + 1);
// Risky: may use a stale value if updates are batched
setCount(count + 1);
Here is why this is so important. React batches state updates that happen during event handlers. If you call setCount(count + 1) three times in the same handler, it will not increment by three, because all three calls see the same count value. The functional form setCount(prev => prev + 1) avoids this issue because each call receives the most recent state.
When useState Is Not Enough: useReducer
useState is the right choice for simple, separate components of state, like a toggle, a text input, or a counter. But when your state logic becomes more complex, has multiple related values that change together, or needs transitions that depend on the type of action being performed, useReducer provides a more structured approach.
useReducer works similarly to how Redux manages state management. You define a reducer function that takes the current state and an action and then returns the new state. The component dispatches actions instead of calling setter functions directly.
const initialState = { count: 0, step: 1 };
function reducer(state, action) {
switch (action.type) {
   case 'increment':
     return { ...state, count: state.count + state.step };
   case 'decrement':
     return { ...state, count: state.count - state.step };
   case 'setStep':
     return { ...state, step: action.payload };
   default:
     return state;
}
}
function Counter() {
const [state, dispatch] = useReducer(reducer, initialState);
return (
   <div>
     <p>Count: {state.count}</p>
     <button onClick={() => dispatch({ type: 'increment' })}>+</button>
     <button onClick={() => dispatch({ type: 'decrement' })}>-</button>
   </div>
);
}
The key advantage is that the reducer function can be extracted outside the component, making it independently testable. It also centralizes all state transitions in one place, which makes complex state logic easier to reason about and debug.
A good rule of thumb: if your state update logic starts using many conditional branches or if separate useState calls are tightly coupled and always need to update together, it is time to combine with useReducer.
useEffect: Side Effects and Lifecycle
useEffect is the second most important hook. It is where your components interact with the outside world. Side effects, operations like fetching data from an API, setting up event listeners, modifying the document title, or subscribing to a WebSocket all belong inside useEffect.
The basic syntax consists of a callback function and a dependency array:
useEffect(() => {
 // This runs after the component renders
 document.title = You clicked ${count} times;
}, [count]); // Only re-run when count changes
You need to understand the dependency array the best. It controls when the effect reruns, and most of the hook-related bugs we see in production stem from mistakes in this area.
Here is how the three variations work:
No dependency array: The effect runs after every single render. This is rarely what you want, and it can easily create performance problems or infinite loops. Use this only when you genuinely need the effect to fire on every render.
Empty array []: The effect runs once after the initial render and never again. Use this for one-time setup, such as fetching initial data when a component loads or adding a global event listener.
Array with specific values [count, userId]: The effect re-runs only when one of the listed values changes between renders. This is the most common pattern and the one you will reach for in most situations.
Fetching Data with useEffect
This is probably the most common use case. Data fetching is probably the most frequent reason you will write a useEffect. A reliable pattern includes three pieces of state: the data itself, a loading indicator, and an error state.
Here is how you fetch data when a component loads:
function UserProfile({ userId }) {
 const [user, setUser] = useState(null);
 const [loading, setLoading] = useState(true);
 useEffect(() => {
   async function fetchUser() {
     setLoading(true);
     const response = await fetch(/api/users/${userId});
     const data = await response.json();
     setUser(data);
     setLoading(false);
   }
   fetchUser();
 }, [userId]);
 if (loading) return <p>Loading...</p>;
 return <h1>{user.name}</h1>;
}
Notice the [userId] dependency. This tells React to re-fetch the data whenever userId changes, which is exactly what you want when navigating between user profiles. If you left out the dependency array entirely, it would fetch on every render. If you used an empty array, it would fetch once and show old data when the prop changes. For a complete walkthrough of how these data-fetching patterns connect to a real API, our guide on building a full-stack React app with Node.js covers the full picture, from frontend hooks to backend routes.
This works, but it has a problem. Let's look at what happens when users navigate quickly.
The Cleanup Function: Preventing Race Conditions and Memory Leaks
Consider this scenario: a user navigates to profile A, and the fetch request starts. Before it completes, the user clicks profile B, triggering a new fetch. If the request for profile A resolves after profile B's request, the old data overwrites the current state. The user sees profile A's data when viewing profile B's page.
This is a race condition, one of the most common bugs in React applications that fetch data.
The solution is useEffect's cleanup function. When you return a function from useEffect, React calls it before the component unmounts and before the effect runs again. This is where you cancel in-flight requests using AbortController:
useEffect(() => { const controller = new AbortController(); async function fetchUser() { try { setLoading(true); const response = await fetch(/api/users/${userId}, { signal: controller.signal, }); const data = await response.json(); setUser(data); } catch (error) { if (error.name !== 'AbortError') { setError(error.message); } } finally { setLoading(false); } }fetchUser();
return () => controller.abort(); }, [userId]);
When userId changes, React calls controller.abort() before running the new effect. The pending request is canceled, and the stale response never updates the state. This pattern applies to any asynchronous work inside useEffect.
The same principle applies to timers, event listeners, and subscriptions. Always pair setup with teardown in the same effect:
useEffect(() => {
const timer = setInterval(() => tick(), 1000);
return () => clearInterval(timer);
}, []);
useEffect(() => {
window.addEventListener('resize', handleResize);
return () => window.removeEventListener('resize', handleResize);
}, []);
If you take one thing from this section, let it be this: every useEffect that creates a subscription, starts a timer, or initiates an async request should return a cleanup function. Skipping this step is how memory leaks enter production applications.
The Mental Model Shift: Think in Data Flow, Not Lifecycle
This is the single most important concept for developers transitioning from class components to hooks, and it is the point where hooks either "click" or remain confusing.
You think about lifecycle events when you use class components. For example, "When the component mounts, get data." When it updates, see if the ID has changed. When it unmounts, cancel the request. You are connecting your logic to certain points in the component's life.
The mental model changes when you use React hooks. You don't ask, "What happens when the component mounts?" Instead, you ask, "What happens when this data changes?" The dependency array for useEffect is not a lifecycle selector. It is a statement of the values that your effect is based on. React takes care of the timing.
Function components run on every render
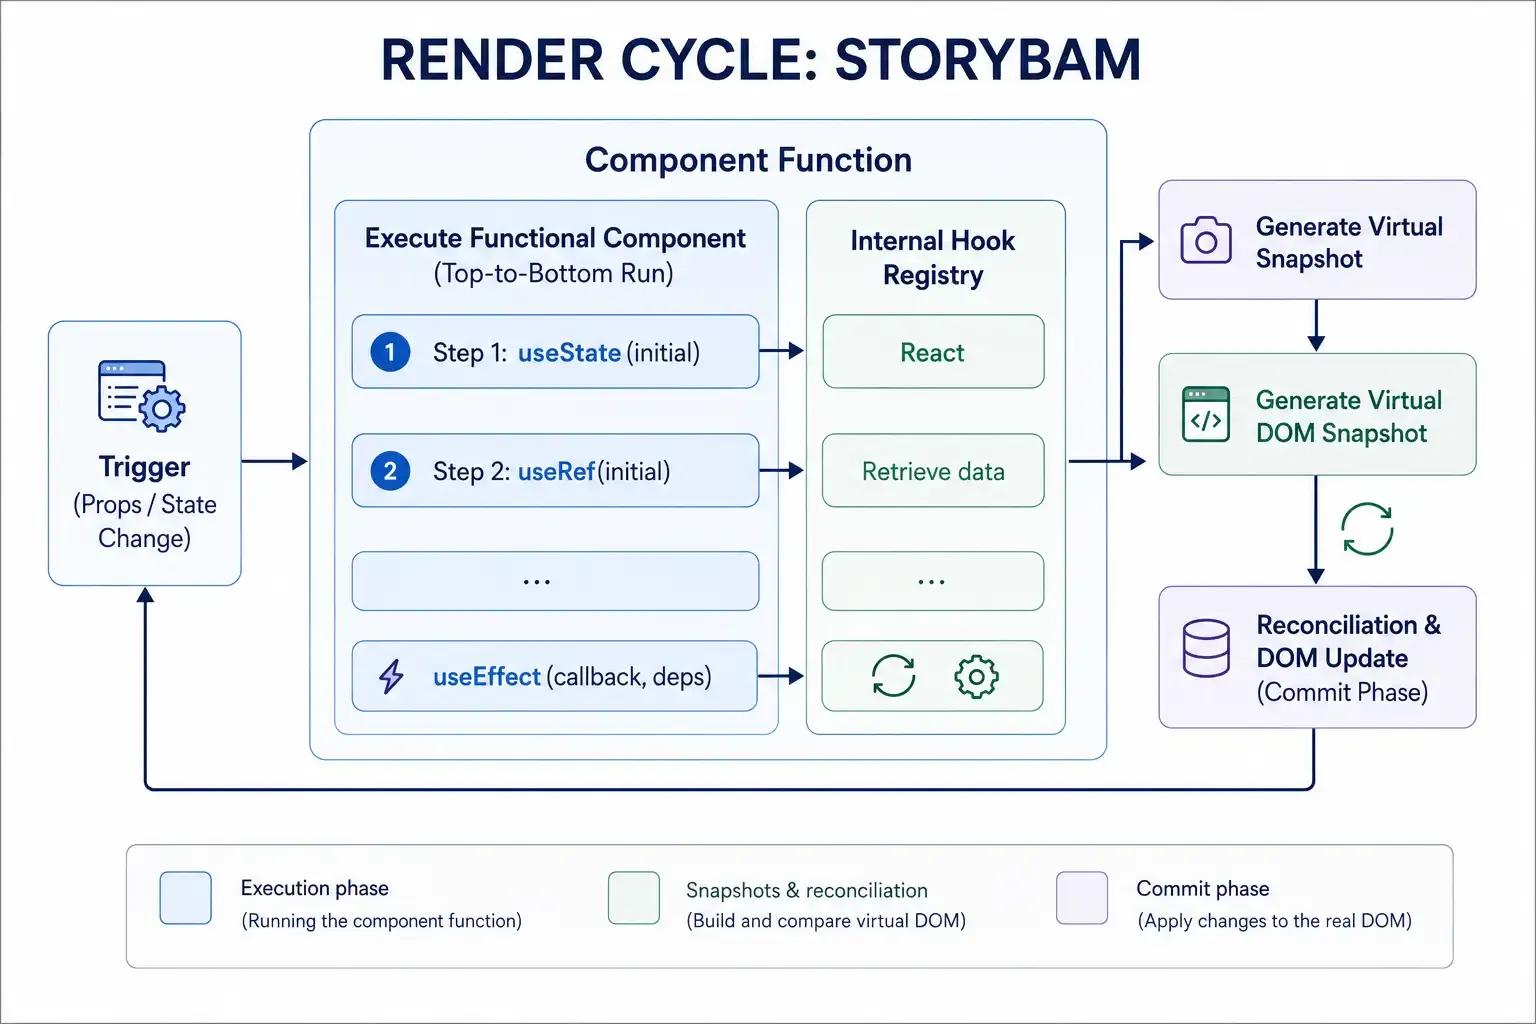
If you understand this key idea, React hooks will make sense to you: React simply runs your function component from top to bottom on every render. There is no persistent instance. No lifecycle methods are being called on a stored object. Your function executes, React reads the returned JSX, and the output is committed to the DOM.
Hooks like useState and useEffect work because React maintains an internal list of hook calls (React Hooks list) for each component. On each render, React walks through that list in order, giving each hook the state it stored on the previous render. This is why hooks must always be called in the same order and why they cannot be placed inside conditionals or loops.
Why this matters: closures and stale values
This execution model has a practical consequence that catches many developers off guard. Every render creates a fresh closure. The variables inside your component function, including props, state, and any values derived from them, are captured at the time of that specific render.
Consider a component in which a user clicks a "Follow" button, and the action is delayed for a few seconds (for example, by a network request). In a class component, this.props is mutable. If the user navigates to a different profile before the request completes, this.props.user points to the new user, not the one who was visible when the button was clicked. The class version follows the wrong user.
In a function component with React hooks, each render captures its own props. The following action uses the user value from the render in which the button was clicked, not the current render. This is the correct behavior for most use cases, and it happens naturally because of how JavaScript closures work.
This is not a bug. It is the foundation of how hooks maintain correctness. When you hear "hooks capture values from the render they were defined in," this is what it means in practice.
useRef: More Than DOM Access
Most developers learn useRef as a way to reference DOM elements:
const inputRef = useRef(null);
// Later, in an event handler:
inputRef.current.focus();
That is a valid use case, but useRef has a broader purpose. It provides a mutable container whose .current property persists across renders without triggering a re-render when it changes. This makes it useful for storing any value that needs to persist across re-renders without triggering a component update.
Tracking whether a component is mounted
This is useful for preventing state updates after a component has been removed from the DOM, which can happen with asynchronous operations:
function useIsMounted() {
const isMounted = useRef(true);
useEffect(() => {
   return () => {
     isMounted.current = false;
   };
}, []);
return isMounted;
}
Storing the previous value of a prop or state variable
React does not provide a built-in way to access the previous render's value, but useRef makes it straightforward:
function usePrevious(value) {
const ref = useRef();
useEffect(() => {
   ref.current = value;
});
return ref.current;
}
Holding a mutable value that should not cause re-renders
Interval IDs, WebSocket connections, and animation frame references are all good candidates for useRef. They need to persist across renders for cleanup, but changing them should not trigger a UI update.
The key distinction: useState is for values that, when changed, should cause the component to re-render and update the UI. useRef is for values that need to persist across renders but should not trigger any visual update.
useContext: Avoiding Prop Drilling
As your application grows, you will encounter prop drilling, the pattern in which you pass data through multiple layers of components just to reach a deeply nested child that actually needs it. The intermediate components do not use the data; they simply forward it. useContext solves this. It lets any component in the tree read shared data directly from a context provider, without intermediate components needing to pass it as props.
The pattern involves three steps: create a context, provide a value at the top of the tree, and consume it wherever needed.
import { createContext, useContext, useState } from 'react';
const ThemeContext = createContext();
function App() {
 const [theme, setTheme] = useState('light');
 return (
   <ThemeContext.Provider value={{ theme, setTheme }}>
     <Header />
     <Main />
   </ThemeContext.Provider>
 );
}
function Header() {
 const { theme, setTheme } = useContext(ThemeContext);
 return (
   <button onClick={() => setTheme(theme === 'light' ? 'dark' : 'light')}>
     Current: {theme}
   </button>
 );
}
The Header component accesses the theme data directly, regardless of how many components sit between App and Header in the tree.
It's important to understand one thing. When the context value changes, all parts that use that context will re-render. This is not usually a problem for data that doesn't change often across the entire application, like themes, user authentication, or locale settings. If your data changes often, you might need to break your context up into smaller, more focused providers or use useMemo to keep the value reference stable.
Context + hooks is a lightweight React Hooks library for state management across many use cases, entirely answering the React Hooks vs Redux question.
useMemo and useCallback: Performance Optimization
These two React hooks exist to prevent unnecessary recalculations or recreations of values and functions between renders. These hooks are about performance, and you should only use them when you actually have a performance problem. Do not add them everywhere by default.
useMemo caches the result of a computation and only calculates it when a dependency changes:
const sortedList = useMemo(() => {
 return items.sort((a, b) => a.name.localeCompare(b.name));
}, [items]);
Without useMemo, the sort operation would run on every render, even when items have not changed. For a list of 10,000 items, that creates visible lag.
useCallback caches a function definition so it maintains the same reference between renders. This is useful when passing functions to child components that use React.memo:
const handleClick = useCallback((id) => {
 setItems(items.filter(item => item.id !== id));
}, [items]);
Without useCallback, handleClick would be recreated on every render with a new reference, causing any memoized child component to re-render unnecessarily.
The Trap: Premature Optimization
This is where developers make mistakes. Each hook has its own cost. React needs to keep the cached value, keep track of dependencies, and check them on every render. For cheap operations, the cost of memoization exceeds the cost of simply recalculating the value.
My recommendation: build your components without useMemo and useCallback first. If you identify a measurable performance problem using React DevTools profiling, add memoization to the specific bottleneck. Wrapping everything in useMemo does not make your application faster. In many cases, it makes it a bit slower while adding complexity to every function signature. For a deeper look at profiling strategies, memoization patterns, and other techniques beyond hooks, see our guide on React performance optimization.
Building React Custom Hooks (Real-World Examples)
React custom hooks are where React's composability model reaches its full potential. A custom hook is simply a JavaScript function whose name starts with use and that calls other hooks internally. The naming convention is not just style; it is what allows the eslint-plugin-react-hooks linter to enforce the Rules of Hooks inside your custom logic.
The decision to extract a custom hook is simple. If you find the same combination of useState and useEffect calls repeated across multiple components, that logic is a candidate for extraction. Let's go through some practical examples.
useLocalStorage Hook
This hook works like useState, but it stores the value in localStorage so it persists when the user refreshes the page.
function useLocalStorage(key, initialValue) { const [value, setValue] = useState(() => { const stored = localStorage.getItem(key); return stored ? JSON.parse(stored) : initialValue; });useEffect(() => { localStorage.setItem(key, JSON.stringify(value)); }, [key, value]);
return [value, setValue]; }
// Usage: const [name, setName] = useLocalStorage('userName', '');
Every component that needs persistent state can now call useLocalStorage instead of manually coordinating reads and writes with the browser's storage API. The logic is written once, tested once, and reused everywhere. That is the beauty of React custom hooks.
useFetch Hook
A more production-oriented example encapsulates the data, loading, and error state pattern we discussed earlier:
function useFetch(url) { const [data, setData] = useState(null); const [loading, setLoading] = useState(true); const [error, setError] = useState(null);useEffect(() => { async function fetchData() { try { setLoading(true); const response = await fetch(url); if (!response.ok) throw new Error('Request failed'); const json = await response.json(); setData(json); } catch (err) { setError(err.message); } finally { setLoading(false); } } fetchData(); }, [url]);
return { data, loading, error }; }
// Usage: const { data, loading, error } = useFetch('/api/products');
Any component that fetches data now gets correct cancellation, error handling, and loading states without writing the boilerplate. That is the power of React custom hooks.
useWindowWidth: Responsive Behavior Without CSS
This is a pattern that demonstrates how hooks make declarative components possible even when dealing with imperative browser APIs:
function useWindowWidth() { const [width, setWidth] = useState(window.innerWidth);useEffect(() => { const handleResize = () => setWidth(window.innerWidth); window.addEventListener('resize', handleResize); return () => window.removeEventListener('resize', handleResize); }, []);
return width; }
// Usage: function MyComponent() { const width = useWindowWidth(); return <p>Window width: {width}px</p>; }
The component reads the window width, and React re-renders it when the value changes. The subscription, cleanup, and state management are all hidden inside the hook. The component's code reads exactly like what it does. This same pattern of wrapping imperative APIs in declarative hooks translates directly to React Native development, where you might build a useDeviceOrientation or useNetworkStatus hook instead. If you are exploring mobile development with React, check out our React Native tutorial.
Design Rules for React Custom Hooks
After creating dozens of React custom hooks for production projects, there are some rules that always work:
One hook, one task. A useFetch hook handles data fetching. A useForm hook handles form state and validation. If a hook starts managing multiple independent tasks, split it. Hooks that try to do too many things become difficult to test and difficult to reuse.
Keep the API surface small. Only return the values and functions that consuming components actually need. Internal state and helper functions should stay hidden inside the hook. A smaller API is easier to understand and less likely to create coupling between independent components.
Name hooks by what they do. useWindowSize, useDebounce, useAuth, useLocalStorage. The use prefix is mandatory for any function that calls other hooks, and the rest of the name should communicate intent at a glance. If you cannot clearly name the hook, it may be because you are trying to do too much.
React Hooks with TypeScript
If your project uses TypeScript, React hooks provide a noticeably better developer experience than class components did. The combination of hooks and TypeScript eliminates much of the boilerplate that made typed React code verbose.
Why React hooks reduced TypeScript noise
With class components, you had to type both props and state as separate interfaces, even when they shared many of the same fields. A component managing a Quotation object needed a QuotationProps interface, a QuotationState interface, and a class declaration that referenced both: class QuotationPage extends Component<QuotationProps, QuotationState>. If the props did not include all the fields of the domain type (for example, omitting the id for a new record), you had to manually declare a second interface, repeating the other fields.
React hooks simplify this significantly. Instead of a combined state interface, you declare individual state variables with useState, and TypeScript infers the types from the default values:
function QuotationPage({ quotation }: { quotation: Quotation }) {
const [data, setData] = useState(quotation);  // type inferred as Quotation
const [signed, setSigned] = useState(false);   // type inferred as boolean
}
No separate state interface required. TypeScript identifies the types from the initial values, and you only need to annotate when the inferred type is not specific enough.
TypeScript utility types that pair well with React hooks
When working with hook-based components, TypeScript provides utility types that reduce the need to duplicate interfaces. Three of them are very helpful:
Omit<T, 'key'> creates a type with all properties of T except the specified key. Useful when a component receives all fields of a domain object except the ID (which has not been assigned yet):
type NewQuotationProps = Omit<Quotation, 'id'>;Pick<T, 'key1' | 'key2'> creates a type with only the specified properties. Useful for components that work with a subset of a larger type:
function QuotationEditor({ id, title }: Pick<Quotation, 'id' | 'title'>) {
// ...
}
Partial<T> makes all properties optional. Useful with useReducer where an action updates a subset of the state:
function reducer(state: Place, action: Action): Partial<Place> {
switch (action.type) {
   case 'city': return { city: action.payload };
   case 'country': return { country: action.payload };
}
}
These utility types are not specific to React hooks, but hooks create the context in which they are most valuable. By splitting the state into individual variables and using functional components, you reduce the number of interfaces you need to write, and the remaining ones can leverage utility types instead of being declared from scratch.
If you are starting a new project and want strong typing with minimal boilerplate, hooks with TypeScript is the recommended combination for modern React development.
How React Tracks Hook State Between Renders
A question that frequently comes up when developers start working with React hooks: how does React know which useState call corresponds to which state variable?
The answer is that React relies on call order. During each render, React maintains an internal list of hook calls. The first useState call always maps to the first slot, the second to the second slot, and so on. React matches hooks by position, not by name.
This mechanism is the reason behind the two Rules of React Hooks:
Only call React hooks at the top level. Never place a hook inside a conditional statement, a loop, or a nested function. If a condition changes between renders, the call order shifts, causing React to map state to the wrong variable. The resulting bugs are subtle and difficult to diagnose.
Only call hooks from React functions. React Hooks work inside functional components and other custom React hooks. They do not work inside regular JavaScript functions, class components, or event handlers defined outside the component body.
The eslint-plugin-react-hooks linter enforces both rules automatically. Install this React Hooks npm package and treat its warnings as errors. Catching a Rules of Hooks violation in your editor is far less costly than debugging one in production.
Common Mistakes and How to Avoid Them
We review a large amount of React code across client projects. These are the hook-related mistakes that appear most often, along with the patterns to avoid them.
Missing dependencies in useEffect. If you use a variable inside useEffect and do not include it in the dependency array, your effect might use outdated data. The react-hooks/exhaustive-deps ESLint rule warns you when a dependency is missing. If adding a dependency causes the effect to run more often than expected, it means the effect's logic needs to be changed, not that the warning should be ignored.
Infinite loops. An infinite loop occurs when an effect updates a state that is also in its dependency array:
// This will loop infinitely
useEffect(() => {
setCount(count + 1);
}, [count]);
The effect runs, updates count, which triggers a re-render, which runs the effect again. To break the cycle, ensure your effect updates state only when the value actually changes, or restructure the logic so the dependency and the updated state are not the same variable.
Using React hooks conditionally. Hooks must be called in the same order every time. Never put a hook inside an if statement or a loop. React relies on the call order to match hooks to their state.
Overusing useMemo and useCallback. I said this before, but it's worth saying again because we see it in almost every codebase we audit. Wrapping every computation in useMemo and every function in useCallback does not improve performance. Both hooks have overhead: storing cached values, tracking dependency arrays, and comparing them on each render.
The right way to do things is to use React DevTools to profile first, identify the real bottleneck, and then use memoization to fix it. Blanket memoization complicates things without any real benefit. Our React performance optimization guide covers profiling workflows and the full range of optimization techniques beyond hooks.
Looking for Senior React Developers?
Applying React hooks effectively in production requires more than knowing the API. It requires experience with patterns like proper cleanup, race condition prevention, TypeScript integration, and custom hook architecture. At Softaims, our React developers are rigorously vetted for these exact competencies through a 5-hour technical assessment.
Whether you need a dedicated frontend developer, a full-stack engineer proficient across React and Node.js, or a mobile app developer who can extend your product to native platforms, our pre-vetted talent pool can match you with the right expertise within 48 hours. The React hooks patterns covered in this guide can also be used directly in React Native development. If you are considering building a mobile app, read our React Native tutorial for building your first app, and our React Native vs Flutter comparison can help you evaluate which framework fits your project.
Browse developer profiles | View pricing | Explore the React roadmap
External Resources and Further Reading
- React Hooks Documentation: https://react.dev/reference/react/hooks
- Dan Abramov's Blog on useEffect: https://overreacted.io
- React DevTools: https://react.dev/learn/react-developer-tools
- Stack Overflow React Hooks Questions: https://stackoverflow.com/questions/tagged/react-hooks
Frequently Asked Questions
Should I use React hooks higher-order components, or render props?
Hooks. They solve the same code-sharing problems that HOCs and render props were designed for, but without the extra nesting, wrapper components, or ambiguity about where data originates. If a piece of logic can be extracted into a custom hook, that is almost always the cleaner approach. HOCs and render props still work, but hooks have largely replaced them in modern React codebases.
What are React custom hooks and why do they matter?
A custom hook is a JavaScript function that starts with use and calls other React hooks internally. They let you extract reusable stateful logic from components. For example, a useFetch hook can encapsulate API call logic (loading state, error handling, data caching) so every component that needs data from an API reuses the same hook instead of duplicating the same useState + useEffect pattern.
What is the difference between useEffect and useLayoutEffect?
Both run side effects after rendering, but useEffect runs asynchronously after the browser paints the screen, while useLayoutEffect runs synchronously before the paint. Use useEffect for most cases (API calls, subscriptions, timers). Use useLayoutEffect only when you need to read or modify the DOM before the user sees the update, like measuring element dimensions to position a tooltip.
What happens if I skip the dependency array in useEffect?
The effect runs after every single render, which is rarely what you want. An empty array [] runs the effect only on mount. An array with specific values [count, name] runs the effect only when those values change. Omitting the array entirely is the most common cause of infinite loops and excessive API calls in beginner React code.
Looking to build with this stack?
Hire React Developers →

 Stackoverflow
Alessio P.

 Verified Expert in Engineering
My name is Alessio P. and I have over 5 years of experience in the tech industry. I specialize in the following technologies: Soundtrack, Ambient Music, Music Production, Angular, Music Arrangement, etc.. I hold a degree in . Some of the notable projects I've worked on include: The Sound of Mortgage Rates, Skialper Buyer's Guide, Studio Bassing Official Site, Gabriele Faoro Industrial Designer's Site, Sonification of NFT, etc.. I am based in Milano, Italy. I've successfully completed 14 projects while developing at Softaims.
Information integrity and application security are my highest priorities in development. I implement robust validation, encryption, and authorization mechanisms to protect sensitive data and ensure compliance. I am experienced in identifying and mitigating common security vulnerabilities in both new and existing applications.
My work methodology involves rigorous testing—at the unit, integration, and security levels—to guarantee the stability and trustworthiness of the solutions I build. At Softaims, this dedication to security forms the basis for client trust and platform reliability.
I consistently monitor and improve system performance, utilizing metrics to drive optimization efforts. I'm motivated by the challenge of creating ultra-reliable systems that safeguard client assets and user data.

Leave a Comment
Need help building your team? Let's discuss your project requirements.
Get matched with top-tier developers within 24 hours and start your project with no pressure of long-term commitment.